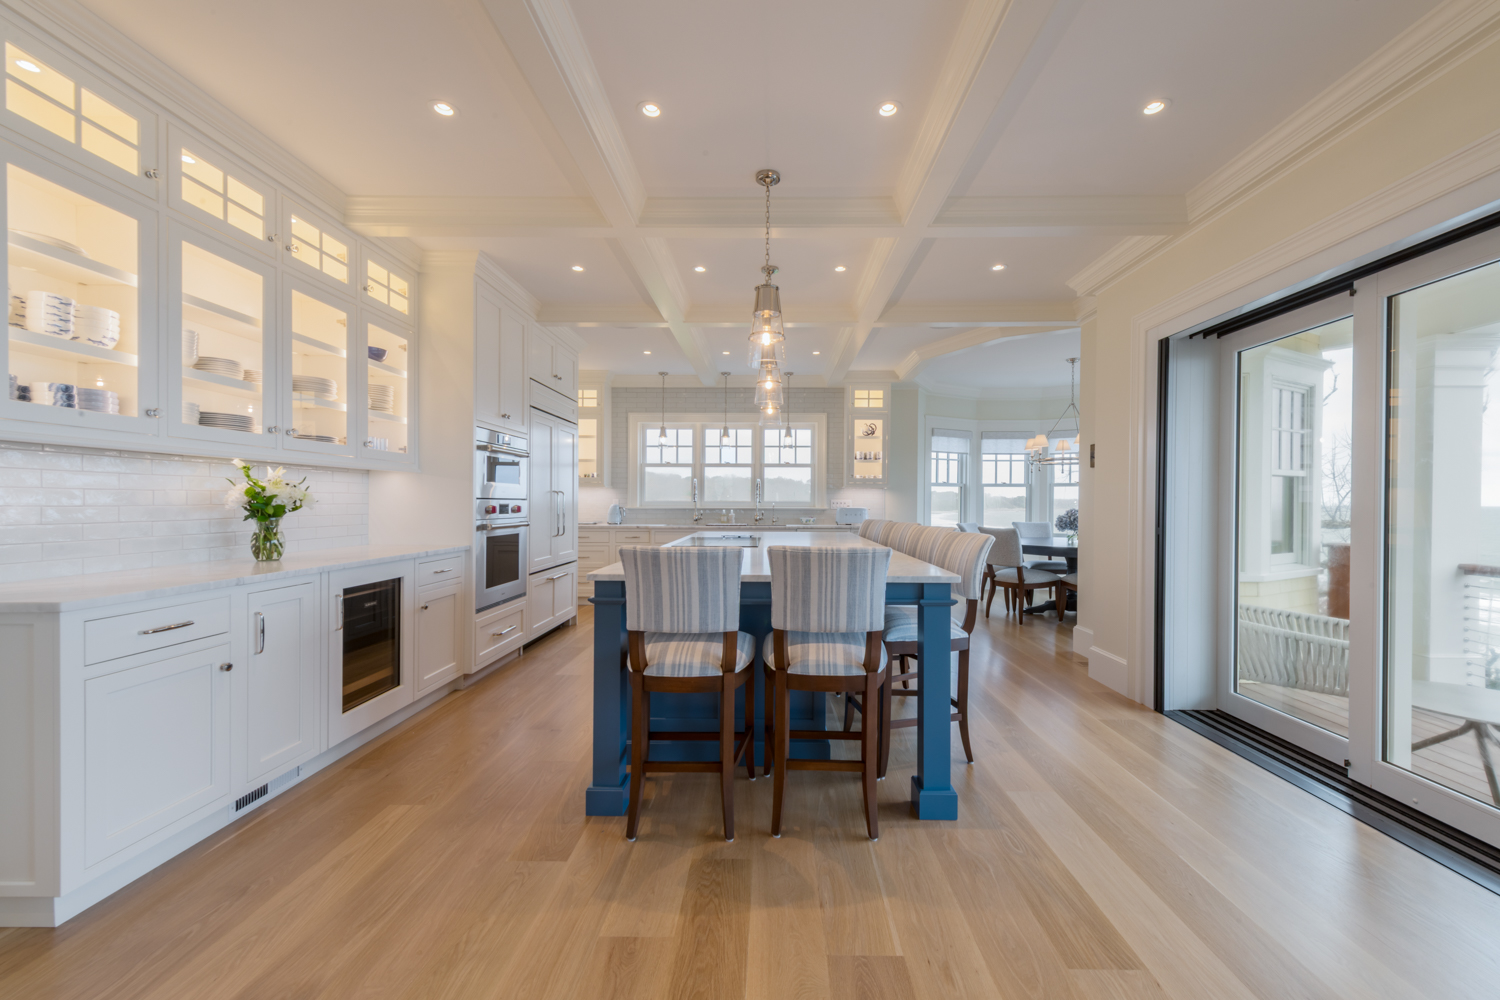
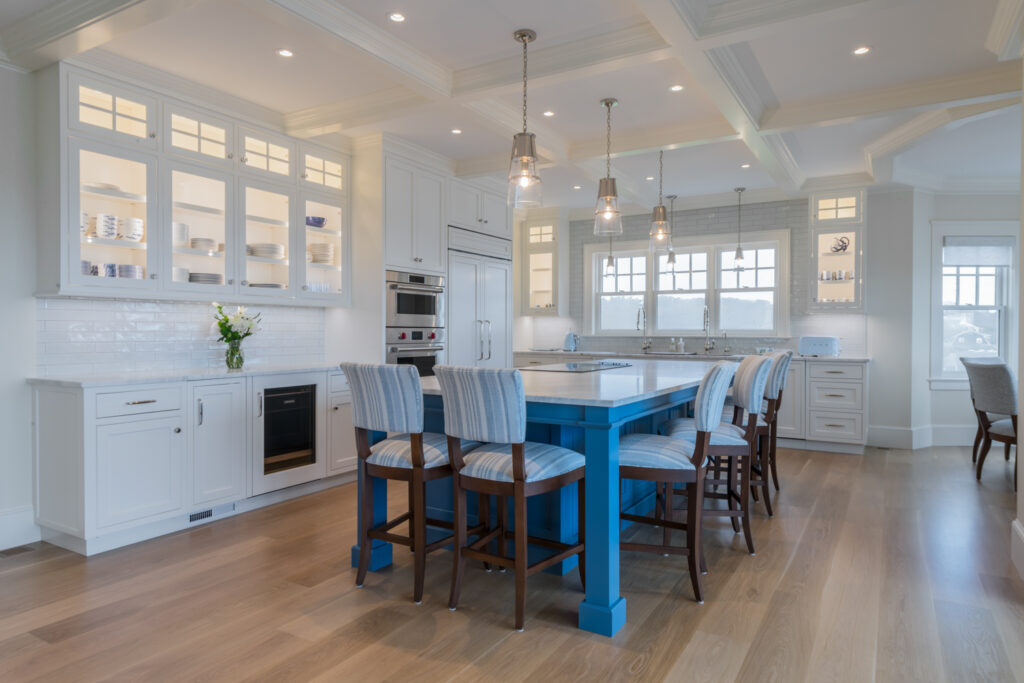
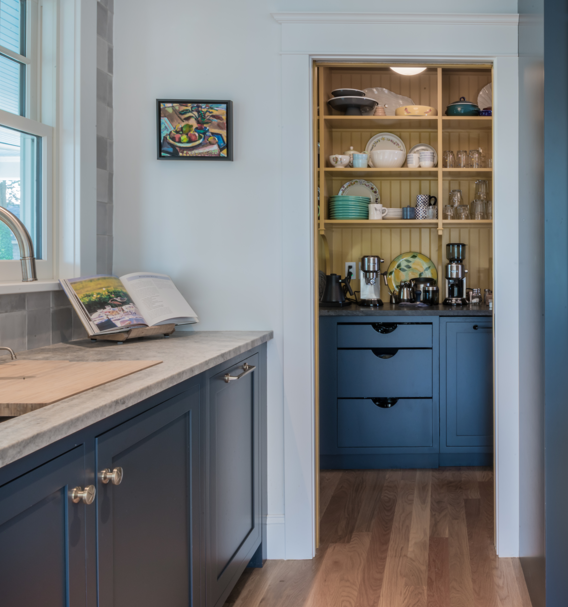
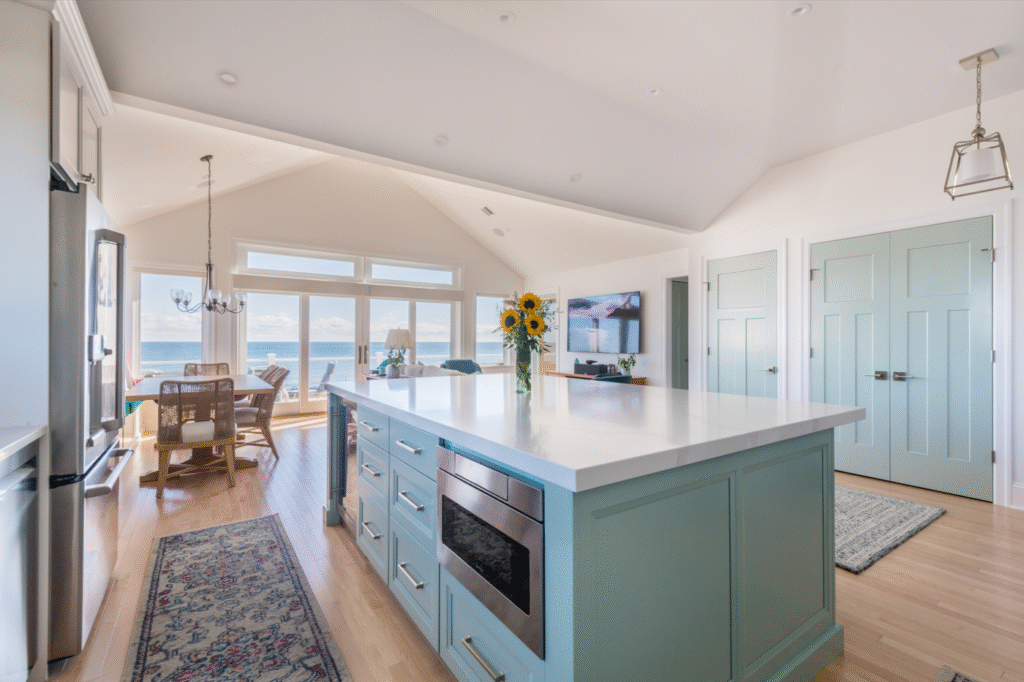
It’s often the subtle details that make the biggest impact. While neutral palettes remain timeless, more homeowners are embracing strategic pops of color as a simple way to bring warmth and personality into their home. A subtle hint of color can completely transform a room. For instance, soft blue cabinets introduce just the right amount of color and character. Sometimes, all it takes is one thoughtful color choice to elevate a room.
Whether it’s a bold blue kitchen island, a soft yellow pantry showcasing collectibles, or a study with a serene sky-blue ceiling, small color accents are a great way to add depth and charm. Pops of color don’t always need to be bold to make an impact. When balanced with natural light and complementary materials, they create spaces that feel collected and inviting.
Here are a few of our favorite ways we’ve seen color introduced
Built-ins and Cabinetry – Adding a contrasting color to a kitchen island, wet bar, or bookcase brings just enough interest and personality to the space.
Interior Trim and Ceilings – A painted ceiling or interior door & trim can enhance the warmth and coziness of your home.
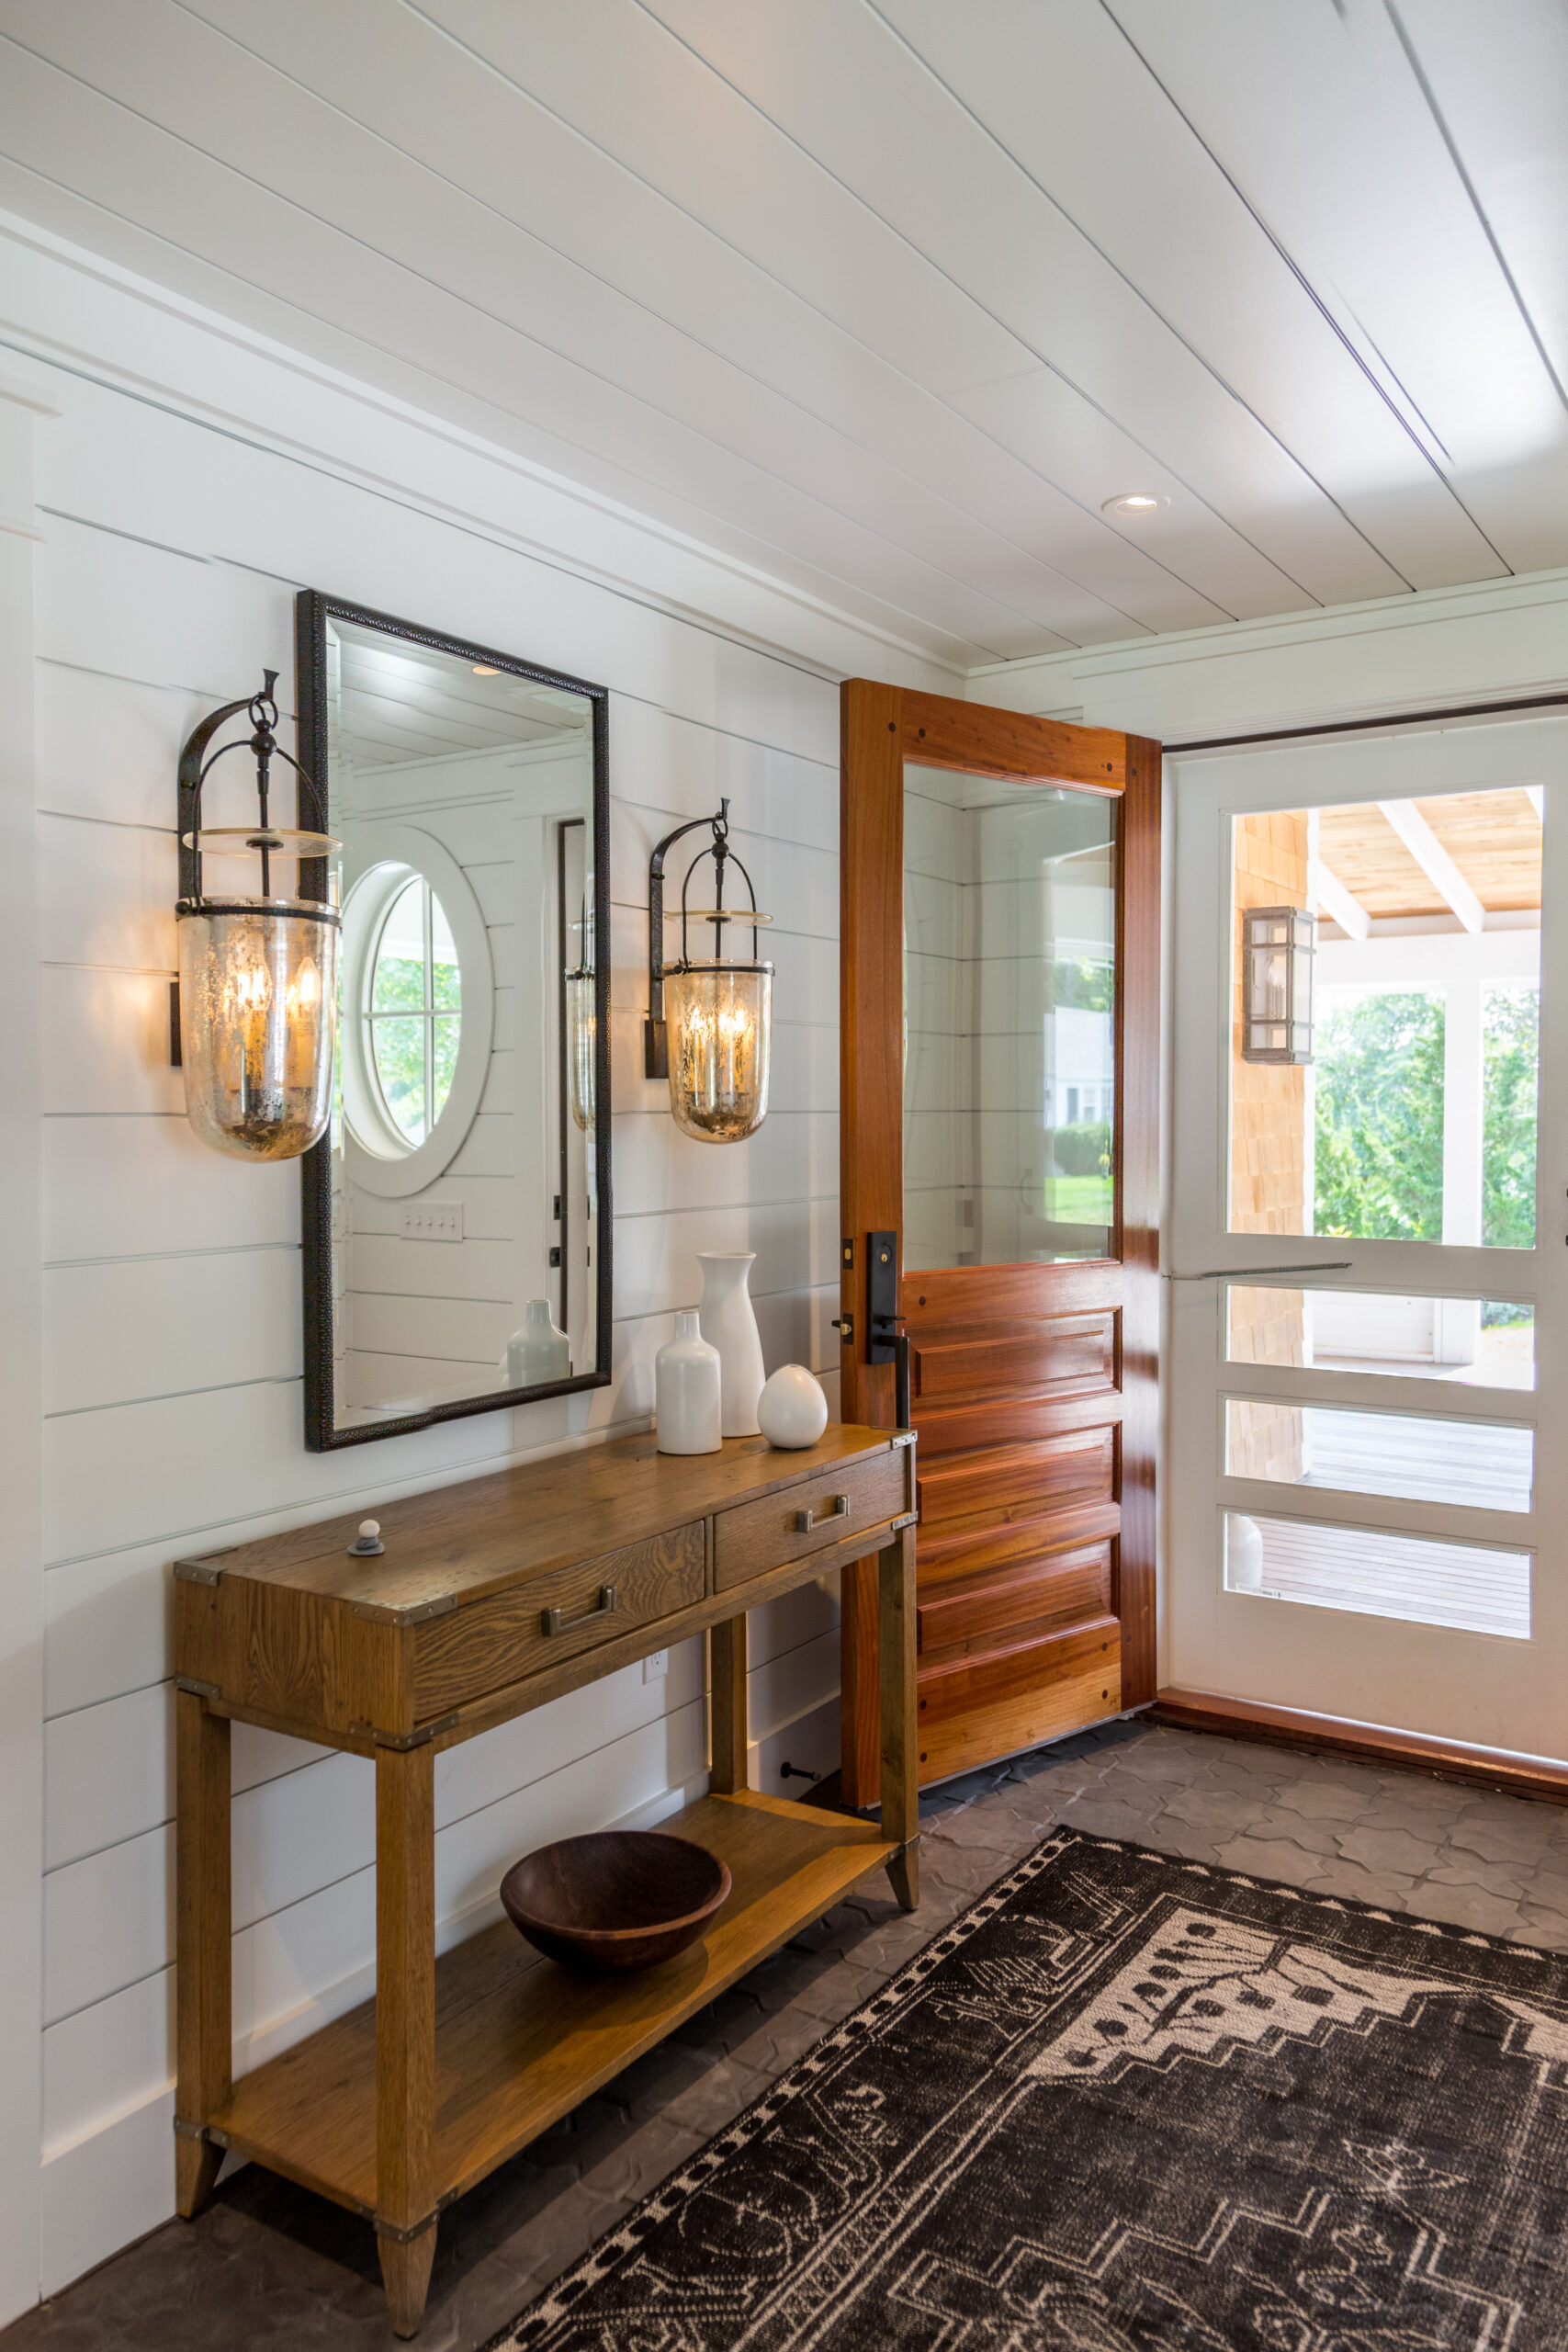
Exterior Doors – A bold color on your front door creates a welcoming atmosphere and sets the tone for your home.
Fall home updates don’t always have to be major and time-consuming. By swapping out textiles, adding layers, creating an inviting entry, and adding seasonal staples, your home can easily reflect the warmth of the season!
Swap Out Kitchen & Bath Textiles
Adding fresh hand towels in warm hues is a quick swap you can make to transform your space. Easily swap your hand soaps and candles with fall-inspired scents. And replace your kitchen and bath floor mats with textured or patterned rugs to provide warmth!
Add Cozy Layers
One of the easiest ways to shift your home from summer to fall is by adding more layers and textures! You can start by adding soft throw blankets and then switching your lightweight throw pillows for pillows with deeper colors. Rugs can even be layered by adding a plush rug on top of a natural rug. These small updates not only make your home more inviting but will help you slow down and enjoy the comfort of your home!
Update Your Entryway
Your entryway sets the tone for your whole home, and Fall is the perfect season to give it a refresh! Adding a basket or stylish tray near the door keeps the entryway stylish yet gives you a space to store your shoes & keys! Setting some hooks to hang textiles, florals, and coats adds some seasonal charm. Bring in small pumpkins, hang a fall wreath, and add some textured vases – all will create a warm hello every time you enter the door.
Add Soft Lighting Features
Lighting can change any atmosphere. Using accent lighting such as table & floor lamps, rather than relying on overhead lighting, can make a huge difference when seeking the perfect fall ambiance.
As we move into the fall season it’s nice to have a quick, handy snack whether you’re enjoying the outdoors or relaxing inside. Here is a favorite of Jill’s that she would like to share.
Prep Time: 5 minutes
Cook Time:15 Minutes
Total Time: 20 minutes
Yield: 3 cups
Ingredients:
2 tablespoons salted butter
3 cups pecan halves
½ cup light brown sugar
½ teaspoon cinnamon
1 teaspoon kosher salt or ¾ teaspoon sea salt
¼ cup water
1 teaspoon vanilla
Instructions:
Preheat your oven to 350°F. Line a baking sheet with parchment paper and set aside.
In a large skillet, melt the butter over medium heat. Add in the pecans and stir continuously for 3 minutes, until the pecans are lightly roasted.
Add in the brown sugar, and stir for an additional 2 minutes, until the sugar is melted.
Stir in the cinnamon and salt, then add the water.
Cook, while stirring continuously, until the water is evaporated, about 1-2 minutes.
Add in vanilla and stir until combined.
Remove the nuts from the heat and spread them evenly on the baking sheet.
Bake for 5-7 minutes, until the candied pecans are fragrant and lightly crisp.
Remove the nuts from the oven and allow them to cool completely on the baking sheet.
Summer is finally here and it’s time to enjoy those perfect summer days and nights. There is nothing quite like a summer cookout spent with family & friends or a long fun filled day at the beach. With all the excitement summer brings, it also can shine light on those projects around the house that may need attention. We’ve shared some helpful tips and reminders to help care for your home this summer.
Clean your dryer vent and exhaust duct to make sure there is no buildup of dust and lint.
Change the filter in your air conditioner and consider scheduling an HVAC professional to service your system.
Clean and consider re-sealing your tile grout.
Do a test of your smoke & carbon monoxide detectors – check your batteries!
Keep an eye on your irrigation system – a faulty sprinkler or irrigation hose that goes unnoticed can quickly cause larger problems for your lawn or even your basement.
Reverse the direction of your ceiling fans. If your fans spin counterclockwise, they will push air straight down and will help keep your home cool this summer!
Pay your attic a visit to check for any signs of mildew, leaks, holes, and even pests.
Clean the grill to prep for all the summer barbequing!
Take a look at your standby generator to make sure it is functioning properly.
Check your gutters and downspouts for any buildup of debris and have cleaned to allow for efficient water flow.
Your condenser has been outside all spring and winter long, make sure it is properly cleaned.
Inspect your foundation for any cracks or leaks.
Wash down your porch and give your deck a glace – check to see if any boards are rotting and may need replacement.
Wash the windows! Why not have a clean fresh start after all the pollen.
Check your outdoor faucets for any leaks.
Inspect the caulking around the windows and doors of your home, this will help keep any unwanted critters out.
Consider having your roof inspected by a professional.
Most importantly, don’t forget we are here to help with any of your home maintenance questions!
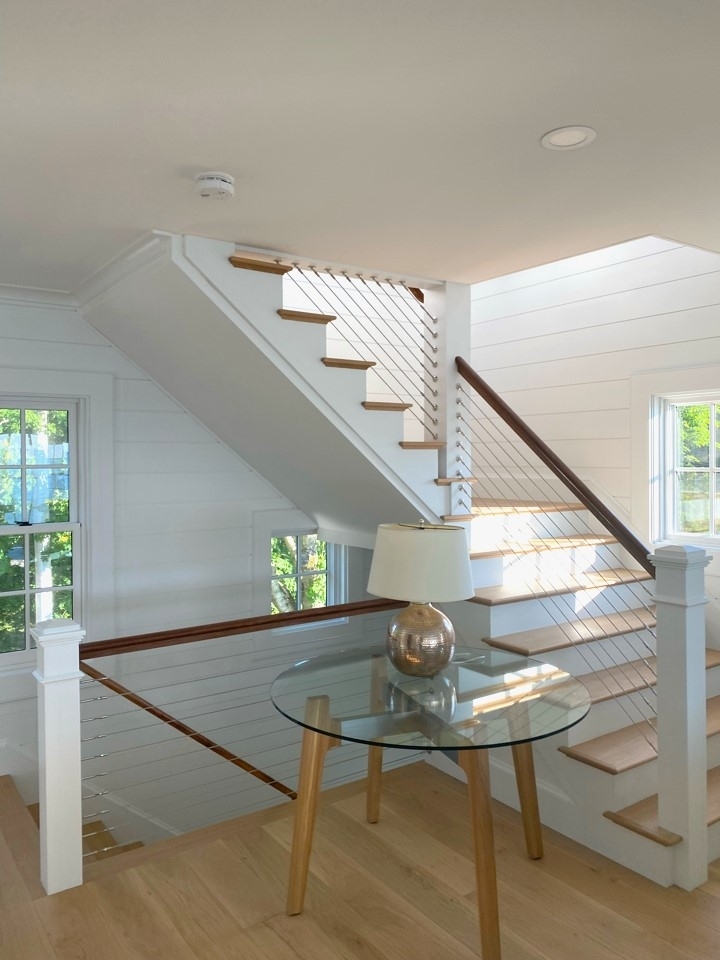
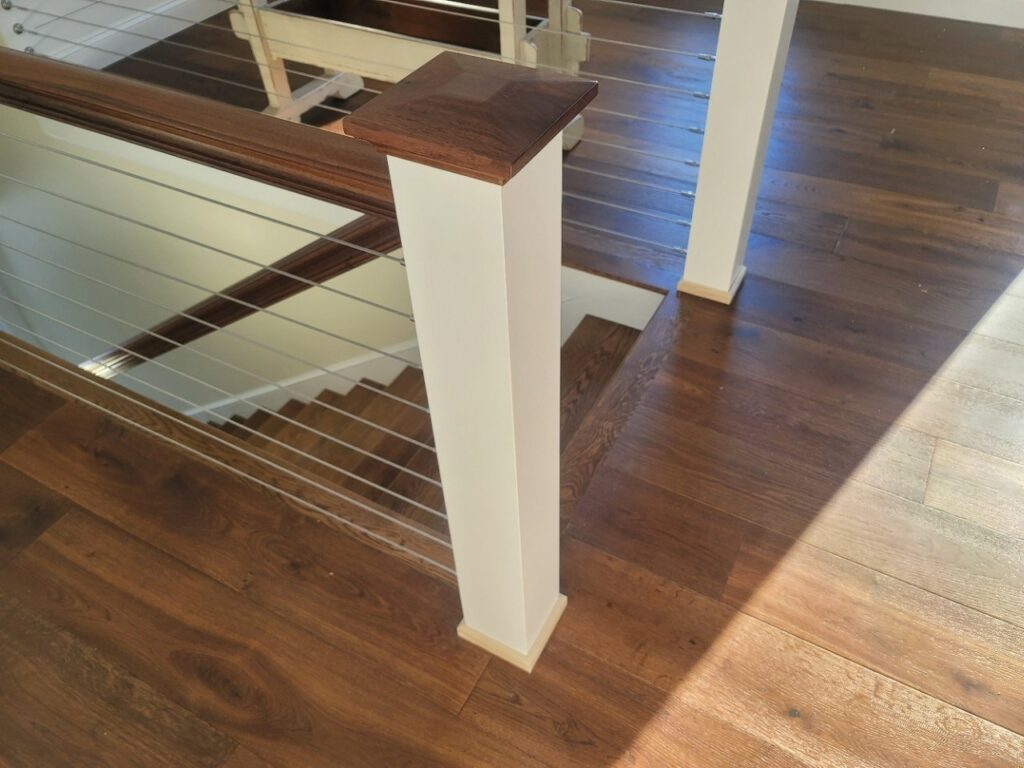
Homeowners often juggle between design and practicality when it comes to finishing touches such as railings. Railings have the tendency to be a detail that is easily overlooked, but ultimately completes the space. A design that remains sleek and inviting while also practical is cable railing. Cable railing offers an impressive visual impact but is much more than just an aesthetic benefit.
A challenge one may face while designing interior and exterior spaces is encompassing the view. Cable railing offers unobstructed views which in return makes the room feel larger and more inviting as your viewpoint goes beyond just the railing. This allows for natural light to shine through and creates a streamline design that is not usually considered a focal point in a home, but without effort, catches anyone’s eye. If you are viewing the space from a distance, the thin lines simply vanish, and the architectural details and/or breath-taking views become center of attention.
Thanks to the design of cable railing, they are effortless to maintain, and their durability brings forth tremendous value to your home. Cable railing serves a variety as they pair well with traditional but also contemporary styled homes, blending well to every taste of design. They allow a homeowner to showcase their personality and the overall beauty of a space, inside or out.
Everyone loves a recipe that is not only super easy but extremely delicious! Rhubarb Zucchini Bread has the perfect hint of tart and savory goodness. This is a favorite in the Thorson office – we’re sure it’ll be a favorite of yours!
Ingredients:
1 Egg
1/3 cup + 1 tablespoon white sugar
1/3 cup brown sugar
1/3 cup vegetable oil
1/4 cup plain nonfat Greek yogurt
2 teaspoons vanilla extract
1 teaspoon fresh lemon zest
1 1/4 cup flour
1/2 teaspoon baking powder
1/2 teaspoon baking soda
1 cup shredded zucchini
1/2 cup rhubarb (about 1 large stalk) finely chopped
3 additional stalks rhubarb to top
Instructions:
Preheat oven to 350 degrees F. Coat an 8.5 x 4.5-inch loaf pan with cooking spray and set aside.
In a large bowl, add 1/3 cup white sugar, brown sugar, vegetable oil, yogurt, vanilla, fresh lemon zest, and whisk in egg.
Add flour, baking powder, and baking soda and stir just until moistened. Don’t over mix. Gently fold in zucchini and chopped rhubarb until well combined.
Transfer batter to your prepared pan and smooth evenly. Slice extra rhubarb stalks in half the long way, remove the backs, but keeping the front -facing part of the rhubarb intact. This takes some of the weight off and keep them from sinking. Lay across the top of your loaf and sprinkle with 1 tablespoon sugar.
Bake 40-35 minutes or until a toothpick entered into the center comes out clean. Wet crumbs are okay if you like your moist. Let cool in the pan 10 minutes before turning out onto a wire rack to cool completely.
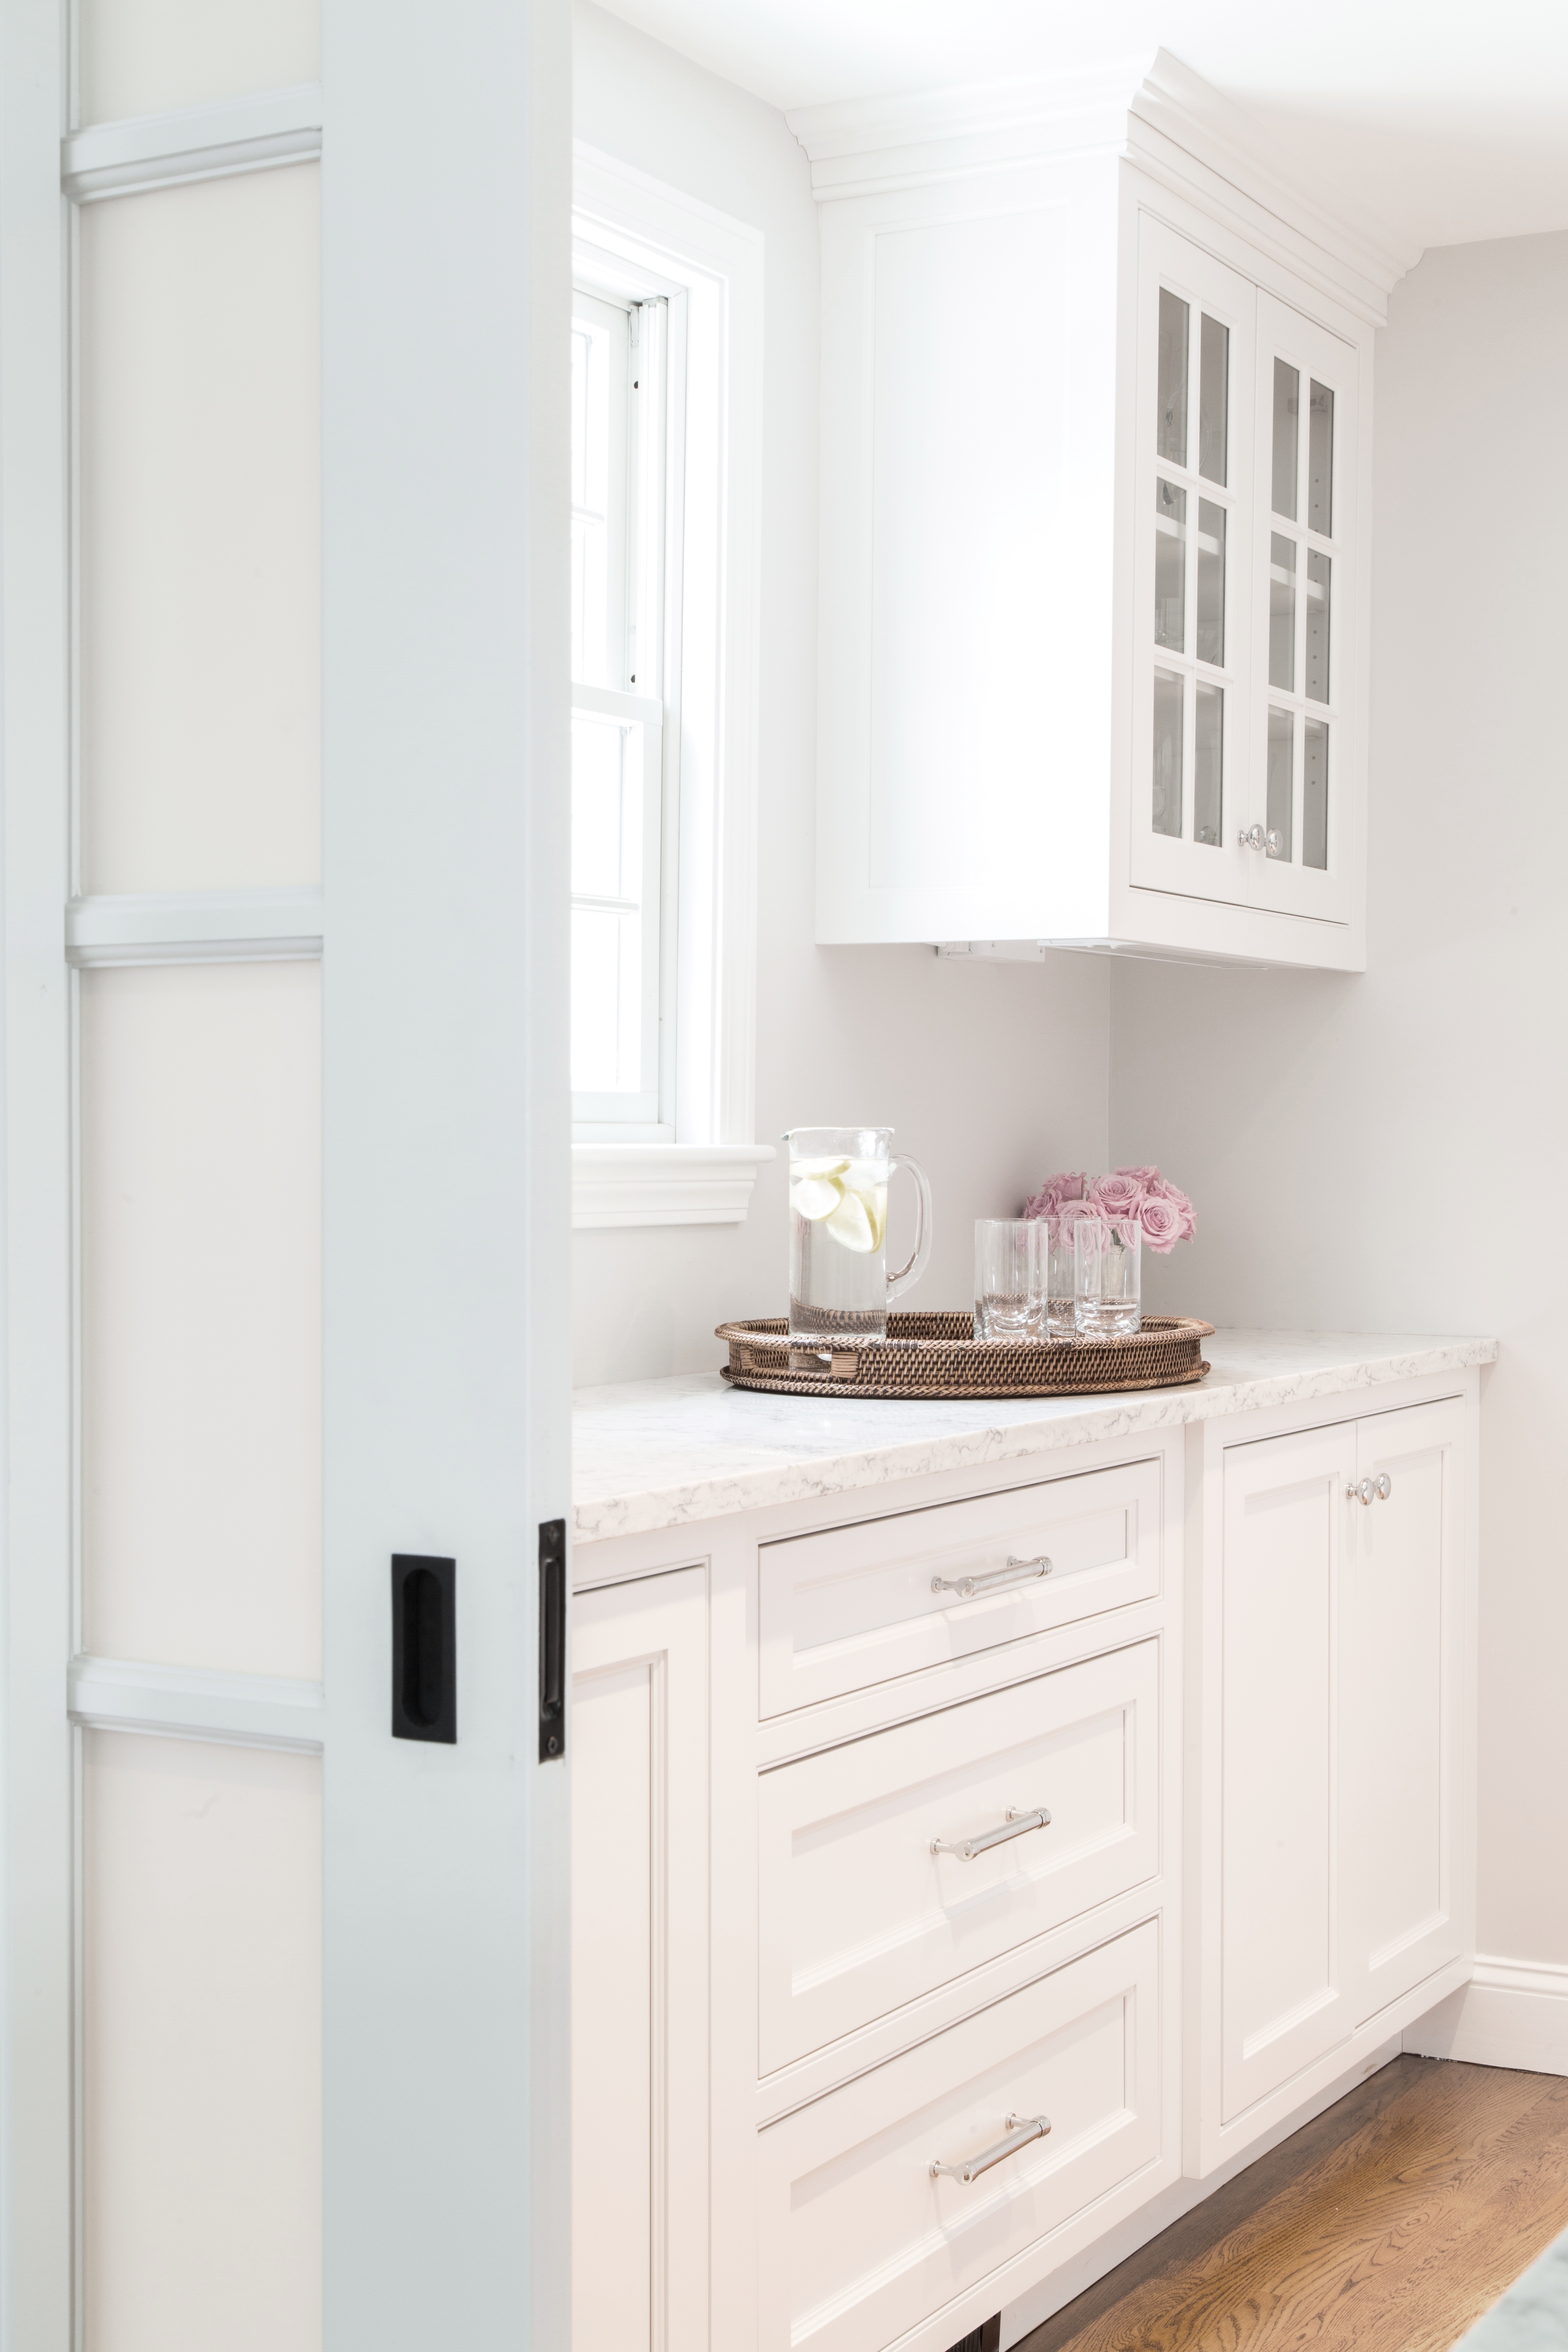
Nowadays, we are seeing the celebration of the pantry (and adaptations of it) and it is finally getting the accolades it deserves. With soapstone or marble shelving, beautiful soft-closing drawers, great lighting, and plenty of space to stock your spices, canned or dry goods, it is a highlight of many new or renovated homes.
Nothing says the holidays like a beautiful platter of freshly baked cookies. Every year, our Office Manager Jeni, kicks off the holiday season with a cookie party, a celebration of baking where her family and friends bring a few batches of their favorite confections, filling themselves with sweet treats. This year’s party was well attended and one cookie stood out from the rest…here’s more about it from Jeni:
This year was our 8th year holding the cookie swap and the same ladies come every year, looking forward to an afternoon without children or spouses and a time to enjoy a glass of champagne or a hot cup of coffee with friends who enjoy baking…and eating.
This Ginger Crinkle cookie this year was by far the crowd favorite – it was just sweet enough with a delicious bite of ginger, great with coffee, tea or a little spiked egg nog.
The coveted Ginger Crinkle Cookie
The recipe can be tweaked a little bit to add a little more or less ginger, cloves or molasses, depending on your taste. Also, we have used granulated sugar or sanding sugar rather than turbinado – either way is just delish.
We hope you enjoy these cookies as much as we do. You may want to make a double or triple batch because they go fast. Here’s how you can whip up a batch of your new favorite cookie:
Recipe courtesty of Jamie Deen.
Ingredients:
2 cups all-purpose flour
2 teaspoons baking soda
1 1/2 teaspoons ground ginger
1 teaspoon ground cinnamon
1/2 teaspoon kosher salt
1/4 teaspoon ground allspice
1/4 teaspoon ground cloves
1/2 cup vegetable shortening
1/4 cup unsalted butter, softened
1/2 cup firmly packed light brown sugar
1/2 cup granulated sugar
1/4 cup molasses
1 large egg
1/4 cup plus 1 tablespoon turbinado sugar
Directions:
Preheat the oven to 350 degrees F.
In a medium bowl, whisk together the flour, baking soda, ground ginger, cinnamon, salt, allspice and cloves. Add the shortening, butter and the brown and granulated sugars to the bowl of a standing mixer fitted with a paddle attachment. Beat on medium speed until light and fluffy, 3 to 4 minutes. Slip in the molasses and egg and beat until well incorporated.
Add the flour mixture by scoopfuls and beat until combined.
Add the turbinado sugar to a small plate or bowl. Roll the dough into balls that are 1 inch in diameter (1/2 ounce in weight), then roll in the sugar. Place 12 balls on a baking sheet 2 inches apart. Bake the cookies 9 to 11 minutes, rotating halfway through the baking time. Cool on the baking sheets for 4 minutes, then continue cooling on wire racks. Repeat with the second batch.
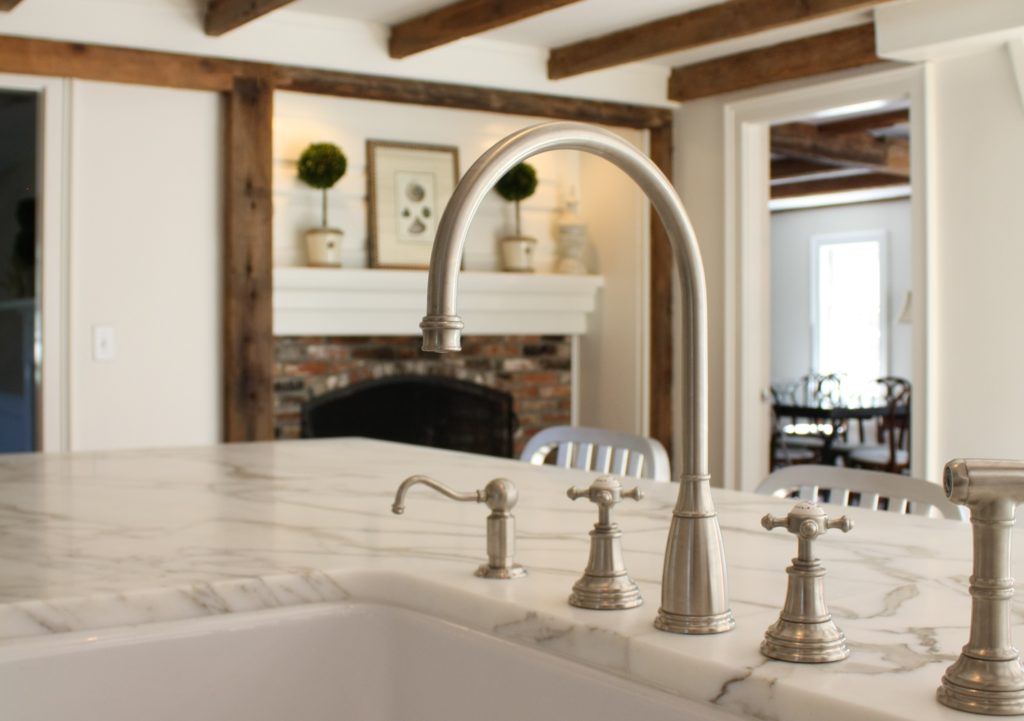
While building or remodeling a home there are countless decisions to be made, some more fun than others. Picking out a roof shingle for instance isn’t very glamorous, but plumbing fixtures are a different story altogether. You can equate selecting plumbing fixtures to picking out that perfect necklace or earrings to go with your outfit or better yet, a watch, which can be both functional and attractive. Plumbing fixtures can have the same effect on a room that jewelry and accessories can have on your wardrobe, they add the finishing touch that can tie everything together or bring just the right amount of sparkle.
Truth be told though, there is more to plumbing fixtures than their looks, they are hard working, permanent fixtures in a home that have lots of moving parts, plenty of code restrictions and a long list of other factors to consider when selecting them. With styles forever changing, technology forever evolving and codes always updating how can you make choices that meet your needs, follow the latest trend, and stay code compliant? We’ll help you find all of the answers you need to make all the right choices for your next project.
Step 1 – Determine your needs & budget
Whether you’re new to the remodeling game or you’re a seasoned veteran you no doubt have had past experiences that will help you to know what you like (or don’t like) about how you currently use fixtures. For instance, I’m a single handle kitchen faucet kind of homeowner -although I can’t argue that an antique cross handle faucet like the one pictured below is gorgeous, in this case, function beats out looks for me hands down.
When my hands are gooped up with a sticky mess, the last thing I want is to have to use both hands to turn on my faucet. Most likely it will be my elbow or wrist so a simple one handle lever faucet will work best or better yet, manufacturers are coming up with new innovations everyday to meet these day to day life challenges. Take the Sensate Faucet from Kohler that operates with the wave of your hand keeping germs at bay and your faucet clean.
Keeping in mind how you use your fixtures will help you to select the right ones. In a shower there are several different ways to set up and install your fixtures based on how you use them. For example, some choose to have multiple fixtures and shower heads but you can set up those heads to operate simultaneously or only one at a time depending if you are a self admitted water hog or prefer to conserve water, energy & money.
In the case of handheld shower heads, there are a few ways to mount them depending on how they will be used. Some opt to use a handshower as their main shower head or a main secondary shower head when more than one person is showering at once. Some mounts are stationary while others allow for the head to be adjusted up or down based on the height of the person showering -a real plus if you are in a household with children or people of varying heights that all share the same shower.
Budget is also a factor when making choices, if you have a fixture allowance from your builder or remodeler you can consult with the plumbing fixture sales associate to guide you towards fixtures that will stay close to or at your budget number. A variety of factors can add to costs including the product finish; Chrome finish is generally the most affordable with other more custom finishes like oil rubbed bronze, polished nickel, matte brass or certain “live” (like raw, unsealed brass or copper) finishes coming in significantly higher.
Step 2: Consult with your Pros
While making your choices you’ll want to consult with both your building and design professionals as well as a qualified and reputable plumbing fixture sales associate. These professionals will be able to guide you toward choices that factor in not just your personal style but also any conflicts or limitations based on your project’s specific circumstances and any code compliance concerns. Remember that these fixtures although they are a design element they have to be able to function properly and safely.
It is tempting in an age when anything can be sourced online for a fraction of the cost of brick & mortar stores to just price shop everything. The risk with the need to find the best deal is that sometimes the best price is NOT always the best value. Online retailers can not always verify the authenticity of their products nor do they have the same level of support or warranties to back them up.
You sometimes even have to be weary of quality of the products sourced from some big box store retailers (who will go nameless). At times these retailers will will have amazing prices on what seem to be the same product you saw at that certified plumbing fixture store your builder recommended. The unfortunate reality however is that some product manufacturers will create a “big box store” version of their products that is of lesser quality ( like plastic interior fittings vs. solid brass) just to bring their products in line with the big box store’s discount pricing structure, while leaving the model numbers and names of the products the same so you the consumer would never know the difference at first glance.
We were personally made aware of this unfortunate reality on one of our projects a few years back when we sourced a bathroom faucet from our reputable certified plumbing fixture dealer and our client opted to add one more sink & faucet and just decided to grab what seemed to be the same faucet at the local “big box store”. When both arrived on site side by side we were amazed at the first major difference; the two boxes with the same manufacturer, same product name and model number felt very different in the boxes. A full 1-2 lb weight discrepancy told us that these two faucets could not be considered equal. Although both looked identical from the outside; the one from the big box store had plastic interior parts while the other had solid brass. This difference won’t present itself right away but rather will affect the longevity of the product and could cause premature failure of the product.
The lesson here? The price though cheaper at first will, in the end, cost the homeowner more in repairs and need for replacement sooner than if a quality product was purchased in the first place. So, trust your Pros when they recommend a supplier. Not only will the products be of better quality, the support you’ll receive from the very beginning of selecting your products and throughout any future need for warranty repairs or replacement will be unmatched as well.
If you need help selecting plumbing fixtures for your next project, don’t hesitate to contact us at 508-279-0656.
Louis Sullivan a 19th Century Chicago based Architect held the belief that “form follows function”, in essence saying that the shape and design of a building should be directly related to or even dictated by it’s intended function. This axiom has become a cornerstone of many design & architectural firms principles.
A kitchen designer often takes this same approach to designing your kitchen, creating a space that functions as well as it looks and is catered to the way the space will be used. After all what good is a beautifully designed space if it doesn’t function well? From the overall layout, inserts and unique cabinet modules to varying operation of cabinet doors and drawers, all of the so-called bells and whistles contribute to the increased functionality of a new kitchen.
Deep drawers instead of cabinet doors.
The full extension soft close drawers allow for easy access to all of its contents without having to open a door bend down and reach in.
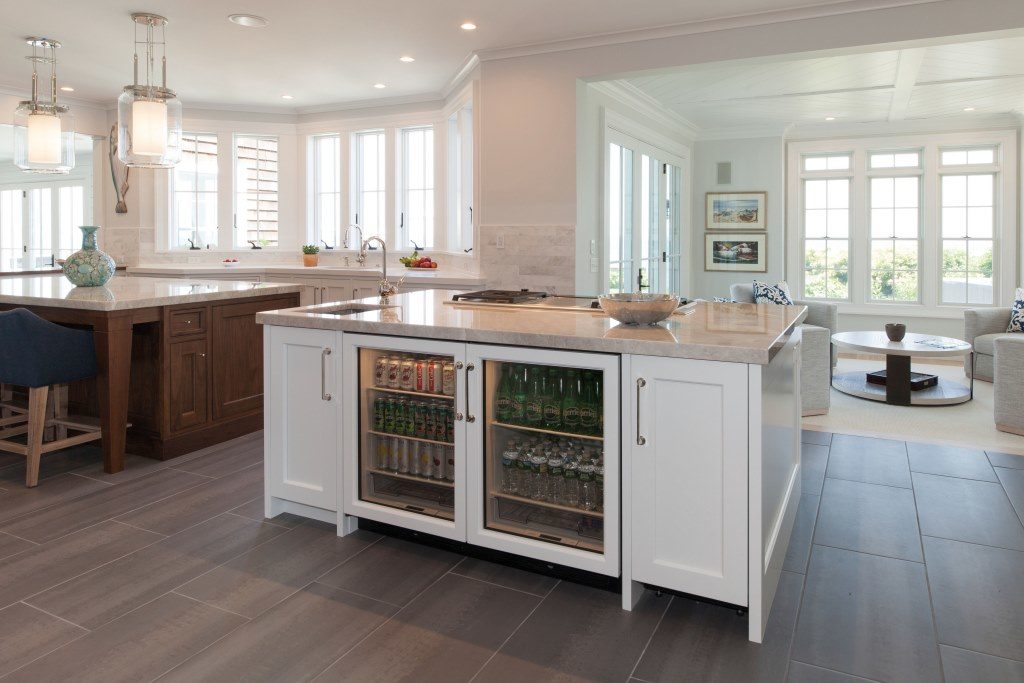
Dual Islands
The old kitchen work triangle concept dictated that you should keep your fridge, sink and cooktop in close proximity to each other, but not everyone uses their kitchen the same way and with kitchens becoming larger and more of a social gathering spot homeowners are breaking the rules. This client from our Plymouth Summer Retreat project opted for two islands, one with seating and storage (the gathering spot LEFT) and the other a more utilitarian application with the cooktop, prep sink beverage center and ice maker door (RIGHT). This keeps the prep and cooking mess away from the island seating area.
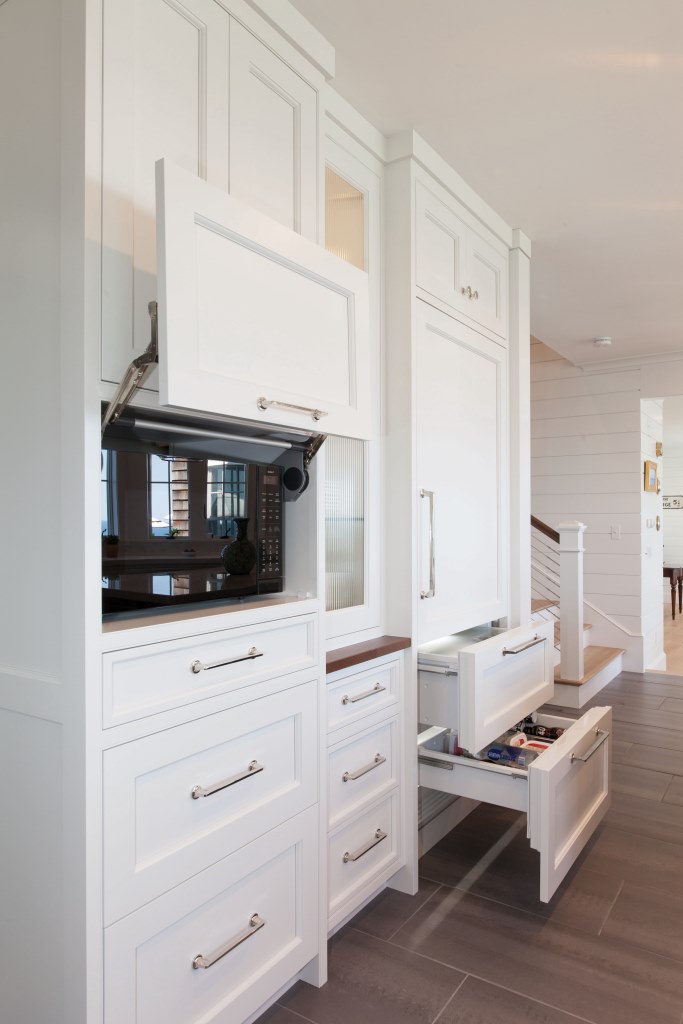
Fridge Drawers & Microwave Garages
This Fridge (below left) has a main upper door and two lower drawers that are individually temperature controlled, great for storing items you use often and want quick access to or to allow younger members of the family to be able to help themselves to healthy snacks. Also pictured are some handy appliance garages, in this case to house the microwave but really these top closing “garages” could be used to hide any appliance you’d prefer not to look at on a daily basis. They keep them out of sight but still readily accessible when needed.
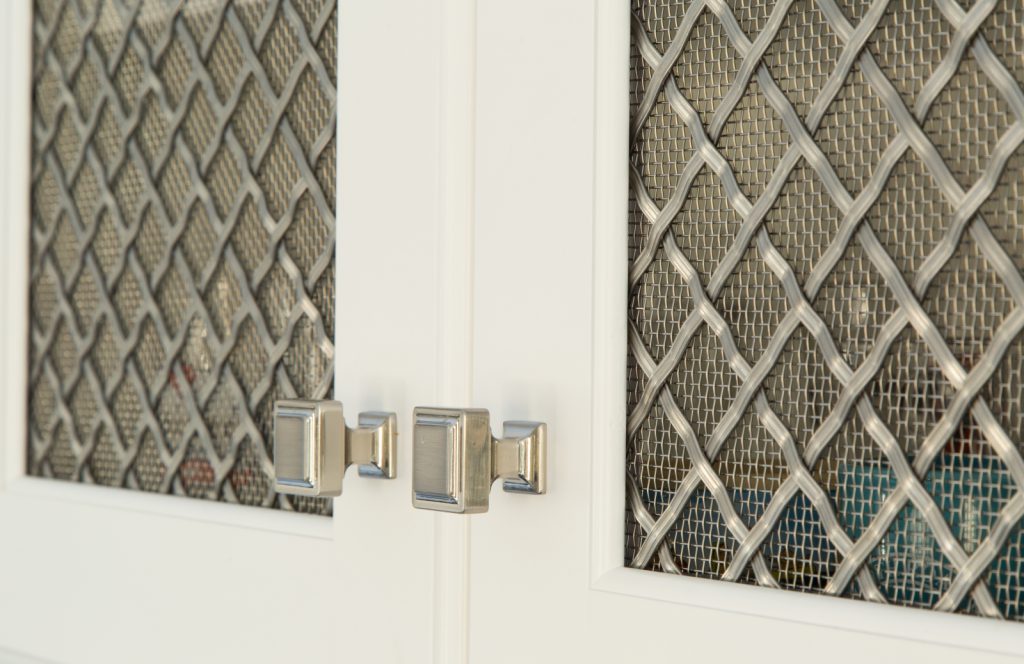
Food Storage & Paper Towel Dispensers
Storing your potatoes & onions and paper towels are not what most think of when creating their dream kitchen, in fact these details can often be overlooked. Good design however will factor in even the little things that can add to the overall functionality of the space. The client from our Lincoln Kitchen & Interior project preferred not to have her counter cluttered with a paper towel dispenser and this handy dispensing drawer located just beside the sink solved the dilemma. You can even store additional rolls behind the main dispenser for easy change out to a new roll!
The metal mesh drawers & cabinet doors allow for storage of items like potatoes & onions that would benefit from some additional ventilation but the feature also adds a unique decorative element.
Want to incorporate some of these clever solutions into your next project? Contact us and we will pair you with one of our trusted Kitchen design partners to get started in planning your dream kitchen!
If you’re like us you’ve likely already had your fair share of ice cream this summer and with the summer heat that last thing you want to think about is turning on your oven to bake a pie, but what if you could have the best of both worlds? Yes that’s right, pie & ice cream all in one, so you can have your pie and eat (ice cream) too!
Carpenter Bob Morrissey and his wife Monica shared this no-bake pie recipe with us and we thought it was a great way to get your pie fix before summer is out. The mash up of fresh cherries, ice cream & chocolate are a winning combination that give a nod to good old fashioned cherry pie without even having to turn on your oven!
Ingredients
1 store bought or homemade oreo cookie pie crust 3/4 cup hot fudge ice cream topping of your choice (Bob likes Smuckers) 4 cups vanilla ice cream, softened 3 cups fresh dark sweet cherries, pitted and quartered, divided 1/2 cup water 1/4 cup sugar 1 tablespoon cornstarch
Instructions
Spread hot fudge topping over oreo crust and freeze until firm, about 30 minutes
Combine softened ice cream and 1 cup cherries; (as an alternative you can use Ben & Jerry’s Cherry Garcia Ice cream) spread over hot fudge. Freeze until firm, about 8 hours
In large saucepan, combine water, sugar and cornstarch; bring to a boil over medium heat, stirring constantly. Stir in remaining cherries, reduce heat and simmer uncovered until thickened and cherries are soft, about 5 minutes. Remove from heat and cool completely. Refrigerate until use.
Remove pie from freezer 10 minutes before cutting. Serve with sauce.
Window details are often overlooked when planning a building or remodeling project. Most homeowners have a broad sense of what their windows may look like based on architectural drawings but they may not give much thought into the many options and details that are available and how those choices will effect the beauty & functionality of their home.
We recently had the privilege of visiting Marvin’s design showroom at their 7 Tide location in Boston. The showroom integrates life size displays and modern technology to create an immersive design experience for builders, architects & homeowners alike. While most don’t think of windows as key design elements in our homes, Marvin is trying to change that perception. With seemingly endless combinations of options this hands on environment helps designers and homeowners get a true sense for the many options and how they affect both the aesthetics and function of your windows and ultimately your home.
Most of our clients are surprised to learn of the number of decisions that need to be made in relation to their window choices so we’d like to take the mystery out of the process and give you a quick list of the many options available. We’re using Marvin windows as our example here because they offer a high quality product with some of the largest variety of options available.
Here is a breakdown of some of the most common features you will need to decide on:
Window Style
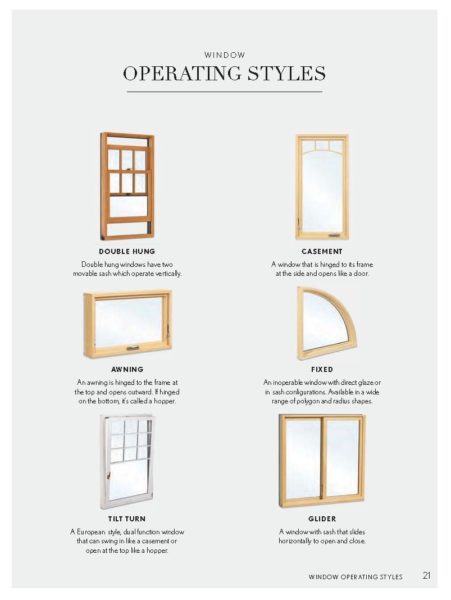
Windows come in different styles or types -the style typically refers to the way the window operates. A home will typically have a combination of different types depending on the application & location of the window. Some of the available types and what they mean are as follows:
Fixed – the glass is stationary or non operational and does not open.
Single hung -fixed top sash and an operable lower sash that slides up and down.
Double hung – Both top and bottom sashes are operable and can slide up and down. Most also tilt in for easy cleaning.
Casement– Single operable sash that opens via a crank or a manual push out that opens the window on one side only -Marvin now offers a revolutionary “wash mode” that allows the casement window to revolve completely around and allow access to clean the exterior from the inside of your home.
Awning– Also a single operable sash that opens the window at the bottom only -providing more water shedding ability when the window is open.
Glider-a double sash window with one fixed and one operable sash that glides/slides left to right.
Tilt Turn -a European style, dual function window that can swing in like a door or casement or open at the top like a hopper for generous air exchange
.
Window Frame Type
Traditional -a traditional window frame is classic in design, the largest of the three frame options
Contemporary -more streamlined cleaner lines, narrower frames -ideal for combining multiple units into stunning window wall configurations
Modern – most streamlined of all options, smallest frame sizes for vast minimally obstructed views. This style is closest to a commercial look and well suited for ultra modern design aesthetics.
Glass & Glazing
A number of glass & glazing options are available; some, like the high wind glass and tempered glass may be required in some circumstances by your local building codes, so check with your builder to confirm your window glass is in compliance with local codes.
The glazing of your window will impact it’s energy efficiency. Marvin’s standard glazing is their “IG” or insulated glass, this is a double pane with argon gas between the panes and Low E2 coating, to act as an insulator and reduce heat exchange through the glass.
Different versions of insulated glass are available including tripane glazing and Low E1, Low E2 and Low E3 to meet the requirements of any climate region. Be sure to check with your local builder or supplier to confirm which is most appropriate for your climate zone and individual application.
Textured , and semi-transparent glass options are also available to be incorporated into any window configuration.
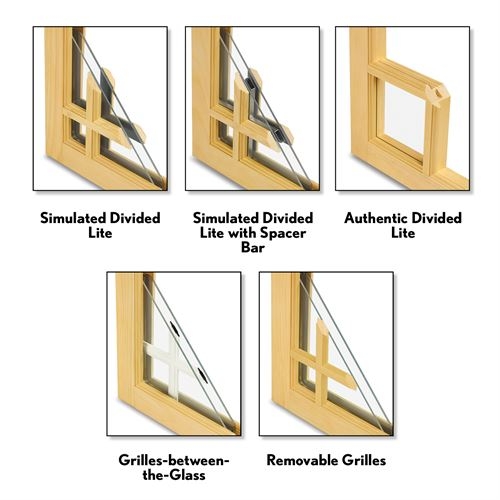
Divided Lites -Type
Divided lights refer to the style of grid that appears to “divide” the window pane. Taking your home style & any existing windows into consideration will help to make this choice. Different options offer various aesthetic & practical advantages. Here is a list of some of the most common divided light styles:
Authentic Divided Light (ADL): individual panes of glass with true divided wood sections in between. This is a common option if historical authenticity is desired.
Simulated Divided Light (SDL): Fixed Grid patterns are installed on both the exterior and interior of the window panes.
Simulated Divided Light with Spacer (SDLS): A spacer bar is added at the locations of the grid pattern to give the illusion of a true divided light.
Grilles Between the Glass (GBG): Grilles are placed in between the two glass panes, this option allows for easier maintenance and clean up of t he glass surface but not everyone likes the look.
Removable Grilles– Many Manufacturers also offer removable grilles that affix to the interior of the glass only and can be removed for cleaning or to change the appearance if desired.
Divided Lites -Pattern
Once you’ve selected the type of divided light, you will need to select the pattern. Your architect may have already included a window grid pattern in your design but you may want to review this detail with the architect & discuss their reasoning behind the choices. Available patterns can vary from one manufacturer to the next. Generally most homeowners choose to maintain the same grid pattern on the entire home or at least per elevation. In some coastal locations however many choose to vary the pattern. For their street side windows they may choose a classic grid pattern because of the architectural interest but prefer unobstructed views on the water side of their home so prefer a cottage style grid pattern or none at all.
With Marvin Windows a homeowner is only limited by their imagination. Although some grid patterns are more standard in nature the possibilities are endless and custom grid patterns can be made upon request to fit almost any design that you or your design professionals can dream up. As with anything however, the more custom in nature an item is the higher the cost to produce.
Color & Finish Options
Marvin Windows offers an aluminum clad product with wood interior and wood/aluminum clad exterior. A number of finish options are available for the exterior & interior. From stained to painted & even custom color finishes.
Marvin 2018 Exterior Clad Color options
Hardware Type & Finish
Because window details are often decided early in a building or remodeling project deciding on details like the window hardware become quite an ordeal. Often our clients want to match all of the interior hardware finishes so deciding on window & door hardware color forces a commitment early in the process.
Different styles of hardware are available on specific products -reference your manufacturer’s catalog for a list of available hardware and finishes for the window types you have selected.
Screen Type & Finish
Even your window screens have options to consider and likely more than you ever thought possible.
Retractable Screen:The innovative Retractable Screen, available on the Ultimate Double Hung Next Generation
Window, is a factory-installed screen that easily retracts out of sight when not in use. The screen can be drawn to rest at one of two stop points. The resulting seal at either the sill or at the checkrail lets the breeze in while keeping insects out. The screen is released from its set position with a click of the latch on the pull bar. With lift assist action, the screen returns to its concealed position as smoothly as it was drawn. The retractable screen sets to the interior of the window.
Full or Half Screen:– Exterior screen with an aluminum surround. The full screen covers both the top and
bottom sash. The half screen only covers the bottom sash.
Two-Lite Storm Sash or Screen A wood frame containing non-removable glass. The storm sash can be removed during the summer and replaced with a wood framed screen. Available only for wood windows.
Storm & Screen Combinations– A combination unit is composed of two glass panels and one screen
panel that can be easily removed from the interior for cleaning. Available with a wood (bare or primed) or aluminum
surround, panels can be configured multiple ways to accommodate season or preference: glass above screen, screen
above glass or glass above glass. One of the panels slides behind the other for self storage when the screen is in use.
Energy Panel– Often confused with storm windows, an energy panel is technically a glazing option. It is a removable,
exterior glass panel finished on the edges by a surround. Energy panels cover the exposed glass surface of each sash and
offer added energy efficiency for wood windows with single glazing.
We hope this list has given you insight into some of the many options that will need to be decided on prior to ordering your windows for your next building or remodeling project. The majority of the information and photos contained in this post were taken from the 2018 Marvin Window & Door Catalog. If you are about to finalize your window choices we highly recommend a visit to Marvin’s Window & Door Design Center at 7 Tide in Boston where a knowledgeable team of representatives are available to guide you through the many available options and how they will best fit into your next project!
Ready to think about windows for your next project?
Contact us and let’s get the conversation started!
A home renovation can sometimes uncover layers of a home’s history. You remove a bank of cabinets to find perfectly preserved floral wallpaper from the 1960’s or several different types of flooring that were installed one on top of another sometimes many layers deep. Peeling back these layers can often lead a homeowner to reflect on the history of their home. If the home is older or perhaps antique it likely had several owners and could have potentially gone through multiple renovations. Each layer tells a story about the house and sometimes even the people who occupied it. Finding these “relics” as we like to call them is not uncommon, we’ve found quite a few over the many years of doing renovations; some more noteworthy than others.
The town of Plymouth, MA has some of the oldest homes in the country and we’ve had the privilege to work on many of them. One project demolition uncovered a date inscribed in the fireplace brick behind the framing, as best as we could distinguish it seemed to read; JAN +1+ 1895. although no name was included, this carving instantly had us imagining the person who may have made the inscription and wondering what life may have been like for them; was it the owner?..or perhaps a worker building this opulent seaside home in an age with no power tools (although ironically the first power tool was invented in 1895)!
More recently another of our projects on Priscilla Beach in Plymouth uncovered yet another relic during demolition; a local real estate listing of the home from 1928 hidden in the walls. The clipping affirmed the date that the house was built and the homeowner also found it interesting to see what the Boston real estate market looked like 90 years ago.
The homeowners Chuck & Cheryl have always owned older/antique homes in Plymouth, many of which have been in the family for generations since their ancestry can be traced all the way back to the Pilgrims. Their house, like many others had become it’s own time capsule, with long lost history preserved in the walls. This steep family history in the area and an appreciation for preserving the past inspired our clients to preserve their own history in the walls of their home in hopes that perhaps tens to hundreds of years later it will be found and a new story uncovered from the past; their story.
The time capsule project thus began…
and Chuck & Cheryl spent some considerable time curating a collection of items that in their opinion may be of interest to future generations. Mind you, the renovation project we are currently completing for Chuck & Cheryl touches almost every inch of the home’s interior and adds on an addition so they knew they would want to tell that story; how the home got to this point, what it looked like prior to the renovation, who performed the renovation (ahem, Thorson of course!) but also wanted to include some personal information about their family and some time stamped articles and items.
The official list of items included were as follows:
A written note giving a bit of history about their family, the date they purchased the house and the purchase price, a project description and an estimated renovation cost.
A before and after photo of the exterior of the house
A Thorson Restoration & Construction business card
The original 1928 real estate news clipping that was found during demolition
A 2018 Plymouth real estate page
The Front page of Plymouth’s local newspaper – The Old Colony Memorial
A science magazine
A financial magazine
A few coins dated 2018
A photo of Chuck & Cheryl’s family taken with Priscilla Beach as the backdrop
Last but not least a lock of hair from Chuck (according to Chuck “in hopes that they might be able to use my DNA to bring me back”)
The items were all packaged in a metal fire safe box, secured and placed in a wall cavity of an upper level bedroom dormer just prior to plaster being installed. This location was chosen because it is an area of the home that is less likely to have a renovation in the near future, unlike a kitchen or bath that are likely to be renovated more frequently as design trends evolve. Chuck & Cheryl’s hope is that this home will stay in the family for generations so will also leave some photos and personal effects in the far reaching corners of their attic for grandchildren and great grandchildren to discover them. The reality though is that this time capsule has the potential to remain sealed away in this home for multiple generations and to one day be discovered by either a distant relative or even a complete stranger, one that will have better insight into their home’s history and the story behind those who occupied it before they did.
Today Chuck & Cheryl’s whole house renovation project is almost complete, after the time capsule was sealed in the walls we moved on to painting, flooring & interior finishes. This project is one that we are proud to be part of knowing that we are in effect leaving a lasting mark on this family, their home and even the impression that future generations will have about the building practices of our era. We hope that if any future homeowners do decide to renovate this home they look at the quality and attention to detail and conclude that “they just don’t build them like they used to”!
Sometimes the value of a home is greater than it’s physical structure and monetary value. Location, family ties and deep rooted nostalgia can boost a home’s personal and perceived value tenfold and that was exactly the case for the homeowner at our Highland Whole House Renovation project.
This multi-phase project began in 2013 with the renovation of the main structure. Phase II added a handsome detached 2 car garage with recreational space above. Fast forward to 2019 and we are just beginning Phase III of this project to build an addition that connects the main house to the garage and adds a spacious master suite. The commencement of Phase III made us reflect back on our long standing relationship with this client and their journey to transform this home from a nostalgic summer retreat to a permanent full time residence that will no doubt last for generations.
This home, built in 1922 was one that evoked a sense of nostalgia for the client who was raised in this coastal community and since returned to spend countless summers always surrounded by friends and family who occupy several other homes in the area. They personally rented this summer home for years and when it came on the market there was no question that they would purchase it and plan to keep in in the family for generations to come. The home was loaded with charm but needed updating, especially in the kitchen and bathrooms. The family also needed more space in the home overall to be able to comfortably summer here.
The resulting design by Noseworthy Residential Design added a full length addition off the rear to include an expanded kitchen, full bathroom, side entry, screen porch & outdoor covered patio. In 2013 Phase I of this multi-phase project began and would be the beginning of an ever evolving project that would fully transform this property while trying to remain true to the original bones & feel of the home.
The house was lifted off of it’s foundation, porches removed and a new full height foundation was poured to allow for the finishing of the entire basement area. This portion of the project presented plenty of challenges but the homeowner once again saw value in making this home well suited for them so chose to move forward despite the complexity of the work. The new full height basement significantly increased the square footage of the home and added an additional bathroom, kitchenette and recreational space that the entire family could make use of.
The scope of the project soon expanded to other parts of the home as the client explains; “At our first meeting with Eric, his excitement inspired us. As he got to know us, he intuitively offered us suggestions that we did not consider, but were just what we wanted.”
In 2016 a small underutilized detached garage on the property was demolished and a new 2 car garage with recreational space above was built in it’s place. The garage is perfect additional entertainment area for the countless family visitors that frequented the property throughout the summer months. Aesthetics of the property were significantly enhanced with exterior finishes to match the newly remodeled main home.
With the garage complete it wasn’t long before the client began planning for phase three of this multi-phase project. The client returned to architect Gordon Noseworthy to draft plans for an expansive master suite addition that would connect the garage and main house and prepare the home for the client to eventually make it their permanent year round residence.
With plans complete & permits pulled, construction on the phase III addition began on March 25, 2019. We look forward to working with this long standing repeat client to complete their vision of a home well suited to their personal lifestyle that maintains its original charm and nostalgia.
If you love your home and it’s charm and nostalgia but wish it was better suited for your lifestyle, now may be the time to start planning!
Contact us and let’s discuss your home’s story and how we can help make it uniquely yours! 508-279-0656
What is a Linear Drain you ask? Well they go by many other names including trough drain, channel drain & slot drain all of which are correct and simply refer to the shape of the grate & drain body. Instead of a round or square drain grate in a central location where all areas of the shower floor are pitched toward the drain; a “linear” drain is linear in shape and the attached drain body is a trough that channels water to one central exit port using a slope in only one direction. Linear drains can be installed in various locations in a shower but the most common is at either an outside wall or at the shower entry point. Drains of this type have been used in commercial applications and overseas for decades but have emerged more prominently on the US residential market in the last decade or so.
We’ve noticed that requests for linear drains are on the rise and they have been incorporated into many of our recent projects. Curbless showers are also gaining in popularity whether it be for better access as a homeowner ages in place or to fit a more modern and streamlined aesthetic. These two features are often combined although it is possible to have one without the other; you can opt for the look of a linear drain but still want the peace of mind that a shower curb brings in terms of containing water in the showering area. There are also alternative “curbless” or “level entry” drain systems that employ a standard center drain but are installed recessed into a subfloor to be able to eliminate the curb. Depending on the reasons for wanting either a linear drain or curbless shower entry a number of factors need to be considered to determine if they’re right for your home & project.
Many homeowners main objective in selecting a linear drain is to achieve a “look”. They perhaps saw one featured in a home design magazine or website and fell in love with the sleek modern feel. Some though, have more practical objectives like handicap accessibility or reducing tripping hazards. Whatever the end goal; there are pros and cons to consider.
Pros
Option for Curbless Shower entry
Although linear drains don’t need to be installed in a level entry application, they do allow for this. Do note however that not all linear drains are recommended to be installed at a level entry point, check with your drain supplier & manufacturer for recommended applications of your specific drain.
Option for multiple drain exit ports Linear drains also allow for additional drain ports within the same drain body. Some states require additional drains by code if the gallon per minute rate of water flowing from multiple fixtures exceeds a predetermined amount. When a shower has multiple heads & body sprays etc. a second drain outlet is usually required. Having two standard drains is typically undesirable but the trough design of a linear drain allows for multiple exit points to be installed in line with the same main trunk, creating the look of only one linear style drain.
Nicer on the feet
Because linear drains are typically installed at the edge of the shower floor it allows for a clear footpath at the showering area and makes it so the person doesn’t have to continually step on the drain underfoot.
Design Flexibility
In a standard shower the floor tile is usually required to be smaller to be able to contour to a floor that pitches in multiple directions toward a central drain. With a linear drain the floor need only pitch in one direction, this allows for a larger format tile to be installed on the shower floor if desired. In some cases even continuing the main bathroom floor right into the shower if installed without a curb. No longer limited by the shower slope you can choose a tile floor of any size and shape meaning the design possibilities are endless! A variety of drain grates are also available on the market today in multiple patterns and finishes to suit any style.
Linear Drain from our “Lincoln Kitchen & Interior” Project
Cons
Higher Cost
While a standard drain is pretty nominal in cost, a linear drain or any level entry drain system can multiply that cost significantly in some cases reaching in to the thousands when all material & labor costs are factored in. The product itself is more expensive and typically the installation, prep work & coordination is bit higher as well.
Installation Limitations Because of the size and requirements to install a linear drain you may be limited on where it can be installed. When working within an existing structure for a renovation the sub floor material, depth of the joists and path for running a drain line all factor into the feasibility of such drains. This style of drain in general is much more difficult to incorporate into an existing structure as a retrofit. Even in a new construction the placement and planning will require much forethought, sometimes well before the engineering and framing phases commence.
Longer lead times & added planning time Because of all of the additional planning involved and the custom nature of some linear drains or level entry drain systems the coordination time is longer and products are often custom ordered with longer lead times to arrive in. Be sure to notify your building professionals far enough in advance so all details can be worked out and products ordered in time for the rough plumbing phase of your project.
Reduced Water Retention
when installing a curbless or level entry drain of any type there is an increased risk of water escaping the showering area. Simply put, water doesn’t always flow where you want it, splashing is inevitable and drains sometimes get clogged. A shower with a curb would at least retain any backup but a curbless shower would not, causing water to migrate to other areas of the bathroom.
Whatever your reason for considering a curbless or linear drain there’s much to research & discuss before pulling the trigger. Every project is different and although one bathroom in a home may be a good candidate for a linear drain , another in the same home may not, so speak with your qualified building or remodeling professional well in advance to discuss your options and allow ample time to plan for a proper installation.
you are a homeowner and just had the kitchen of your dreams installed and are so happy to begin using your new space, you plug back in your appliances, coffee maker, lamps etc. and settle in. One day seemingly out of the blue, your electrical breaker trips, you find the breaker and turn it back on because you’re a pretty handy homeowner and “YOU GOT THIS”, then it happens again and again until you decide it’s time to call a Pro.
If this scenario sounds all too familiar and you have a problem with persistently tripping breakers you are not alone, this is a common issue that we get calls about frequently. The main objective in calling a pro is to get to the bottom of the issue since it’s not always as easily identifiable for most homeowners. Unfortunately, getting to the bottom of the issue is perhaps even more difficult (even for the Pros) since the updating of certain electrical codes.
The various code councils are always assessing and updating code standards to safeguard the health, safety, and general welfare of building occupants. Many of these code upgrades have to do with shock & fire prevention in an around the electrical wiring in your home.
Some of the more recent electrical code updates stipulate that specific types of electrical breakers be used in certain areas of the home to help prevent fires. Any measure to prevent fires and increase safety in a home is definitely a positive change, however some negative ramifications have come from some of these changes as well.
These newly required breaker types are called AFCI (arc fault circuit interrupter) or CAFI (combination arc fault interrupter) and are designed to sense arcs, many of which are normal in the operation of switches, motors and other electrical appliances. The breaker is supposed to turn the circuit off when it detects a dangerous arc caused by a frayed cord, or a loose connection or any other problematic item that could start a fire. Very good thing right? Well, yes of course, but the nature of these newer devices is that they are designed to be pretty sensitive at times leading to what is called “nuisance tripping” or tripping of a circuit for no apparent or identifiable reason. Of course there is always a reason, but identifying a valid safety concern and addressing the reason can be where issues arise.
At times, older products with motors will cause the AFCI breaker to trip. This is because the brushes wear down on these older motors, which causes the arc pattern to become irregular and not as rhythmic as when the motor was new. This causes AFCI to detect this as an arc and trip the circuit for safety.
Do note that AFCI breakers differ from GFCI breakers that are designed to trip when the load becomes unbalanced between the hot and neutral wires, also known as an electrical “leak”. GFCI breakers are to protect people from getting shocked versus AFCI which are to prevent electrical fires. Both AFCI and GFCI breakers perform the duties of a standard circuit breaker which is to protect the wiring from short circuits and overload conditions.
Note that combination AFCI and GFCI breakers are also used and do all of the functions described above. These breakers are commonly used on dishwashers, disposals, kitchen circuits and other kitchen appliances near the sink.
Ok, enough talk about the technicalities right? Let’s get back to the issue at hand, identifying the cause and knowing when to call in the professionals.
What to Do
Step 1
Identify the Circuit causing the issue.
At the breaker panel identify the circuit that has tripped. The switch will be in the neutral position (between on and off).
If the circuit is an AFCI breaker it will be labeled as such and will have a “test” button and sometimes light indicators. Below is an example of what AFCI breakers look like:
Step 2
Isolate the potential cause.
Unplug all fixtures/appliances plugged in to the circuit.
Turn the circuit switch back into the “on” position
Plug in each appliance or fixture back into an outlet on this circuit one at a time and turn on or run each for a time to see if any of them are causing the trip to occur.
Most common items that trigger AFCI Tripping:
1. Vacuums, , typically being plugged in or unplugged when turned on
2. Any older motorized appliance or tool
3. Fluorescent lights
4. Surge protectors/power strips
5. Older appliances or fixtures
6. Any appliance or fixture with a worn plug or wiring (sometimes caused when furniture is pushed against plugs)
7. HAM Radios
8. Loose light bulbs, worn receptacles, plugs not fully plugged into the receptacle.
Step 3
If any of the devices trigger a trip, unplug the item and test it on another circuit that is also AFCI protected. If this same device trips a different AFCI circuit breaker, it’s the result of incompatibility between the electronic device and the AFCI breaker, or possibly a major problem with the device. You can try relocating the device to a non –AFCI protected circuit or if the device is older or plug/wiring is worn you may want to consider replacing the fixture to reduce fire hazard risk & reduce chances of future nuisance tripping.
If the trip is not duplicated in another AFCI circuit, contact your electrician for further investigation.
What a great year 2018 was! We had a diverse mix of projects, fabulous clients, high accolades and an ever talented team of craftsman and trade professionals that worked harder than ever to make it all happen! We are grateful for each and every part of this year and are looking forward to what 2019 has in store!
Check out our 2018 Recap video for this year’s highlights!
We are seeing more homeowners who want their counters to be thicker in appearance. A substantial edge on a counter creates a modern look but the aesthetic has crept into even some of the most traditional kitchens and baths and adds impact regardless of the style of the space.
What most don’t know about these thicker counters is that they are actually a mitered edge. It is very uncommon (and costly) to have a stone slab cut at a thicker depth. It would make the stone almost unmanageable for installation and may even be too heavy for most cabinetry that would support it.
A standard counter thickness ranges anywhere from 3/4″ – 1 1/8″. To achieve the thicker edge two pieces of stone are cut at a 45 degree angle and joined together on all visible sides of the counter. The joints are barely visible even upon close inspection and give the appearance of a solid slab of stone. When done correctly the veining in the stone appears to continue over the edge, adding to the illusion. Because each counter is custom fabricated you can make the edge any thickness you desire but proper planning is key.
If you are considering a mitered edge counter for your next project you’ll have to inform your cabinet designer early in the planning process. Cabinet heights are usually based on standard counter thicknesses. If your counters are approaching 2+ inches or more in thickness it may affect the feel of the finished height of the counter. You will need to factor in your height and preference for a comfortable working height of your counters. If the height difference doesn’t bother you then you may be able to stick with standard height cabinets but dependent upon the thickness you choose you may need a more custom cabinet base option to account for the added thickness. Your preferences should be worked out well in advance with your design and building professionals so all factors can be considered.
Many of our clients opt for the mitered edge detail on only a portion of the counters in their kitchen. The photos below from our Lincoln Kitchen & Interior Projectare an example of a mitered edge just on the island but standard edge thickness on the perimeter. The white quartz center island becomes a beautiful focal point and the thick mitered edge is even more dramatic against the warm walnut wood tones of the island.
Most every phase of a remodeling project will generate dust from various sources; tiny pieces of cement, silicates, lead, wood, insulation and dirt from demolition; sawing lumber; cutting tile, countertops, and flooring; sanding drywall and more. These get into the air and have the potential to settle on you, your children, your pets, furniture, clothes, towels, toothbrushes, even in your lungs. Dust that gets everywhere. And could stay around even months after the remodeling project is over…unless something is done to help prevent it from the start.
How we help deal with it
At Thorson Restoration & Construction we put our clients health, safety & satisfaction at the top of our priority list…even when it comes to dust. We use the revolutionary new BuildClean Dust Control System as a part of our multi-level dust control plan. BuildClean eliminates 90% of airborne construction dust with a pre-filter that captures large dust particles and a HEPA-certified second-stage filter that traps microscopic particulates in the air as small as one micron in diameter. BuildClean is a quiet and effective method of dust control that provides continuous and highly efficient air filtration during construction. So airborne dust is actually trapped and contained within the job work area – and then eliminated. That keeps the areas outside the construction site cleaner. And keeps construction dust from lingering in your home months after the work is done.
How you benefit
Provides a more livable environment during remodeling
Offers healthier conditions for you, your family and pets
Protects sensitive electronics like computers and televisions
Eliminates 90% if airborne dust particles for easier cleanup
How it works
BuildClean Unit: Fully contained and portable to any location
Coarse Pre-Filter: catches large particulates
Fine HEPA Filter: Incredibly effective. Certified at an efficiency rate of 99.99% at .3 microns.
Dynamic fan speed control increases motor speed as filters load, maintaining desired CFM air flow
Air Outlet: Allows ducting so BuildClean can be used as a negative air machine (a way to effectively expel air out of a contained area).
When a prospective client calls our office they have two main questions that often become the determining factor in whether we can work together or not; When can you start? and how much will it cost? Although these two questions are important and valid, they often can only be answered after we ask a few questions of our own;
How far along in the planning process are you?
Do you have a clearly defined scope of work?
Have you checked your local town laws and regulations regarding ability to perform the work?
Are architectural plans prepared and contain enough information to provide an accurate cost estimate?
Have you thought about the materials and finishes your project will include?
Many homeowners are very focused on cost and timing and forget the many details that need to be considered before they even begin to obtain pricing for a project.
The reality is that the planning portion should be the longest phase of the entire building or renovation project. The planning phase is a multi-step process that should not be rushed. So before you take the leap and call a contractor to ask the two ever important questions (how much? & how long?) take a moment and review the 5 steps to planning any building or remodeling project below and arm yourself with the information you need to have a successful and well planned project!
Step 1
Determine your objective & budget
Keeping in mind why you are remodeling start to determine the scope of the project. Will you add on to the home or work within the existing footprint? Are you planning significant structural changes to the home or just looking to update finishes and fixtures? These questions will help you determine the right professionals to contact first.
Having clear budgetary goals will help when determining scope also, obviously the more involved a project is, the more it will cost so your budget may to a degree drive the scope of the project. Many homeowners don’t know what a project in their area would cost so have a hard time with this step. They may try to get a bid for the project as a first step, but we advise against this because this early in the process it is almost impossible to project an accurate budget number.
Instead, we point prospective clients to Remodeling Magazine’s Cost vs. Value reportto get a general sense of where their budget should be. The report lists cost ranges for 35 of the most popular renovations and the data is separated by region so the numbers are more accurate than a national average or regional study. An alternative would be to ask a trusted friend or relative who has remodeled recently or at least in the last 1-3 years. Armed with a general idea of what your project may cost will help you to better refine the scope and determine exactly what your budget will allow.
Step 2
Gather information & ideas
If an addition or structural changes are in the plan then you will likely have some zoning, historical or conservation regulations to abide by. In some historic locations any change to the home’s exterior warrant a check in with the Historical Commision to ensure your plans are in compliance.
You can gather necessary documents like site plans, septic plans and as built plans from your local town offices. These documents will help you determine the area you have to work within to add on to a structure and will be necessary for the design & permitting phase. You will likely also need to enlist the services of a site/civil engineer to draft new site plans showing your proposed changes if you will be altering the footprint or height of your home.
Now is also the time to start gathering ideas about your style & material preferences. Use online resources like Pinterest and Houzz to create digital idea books about spaces, designs and products that you like. The more specific you can be about the style, finishes and products you prefer the easier it will be for the professionals to plan for and price your project as accurately as possible.
Step 3
Hire an Architect or Designer
If structural changes are in the plan, an architect will be the next step. If only interior renovations are planned you may just want to enlist the help of an interior designer. Architects and designers have inherently unique styles and strengths so do your homework and find one that tends to have an aesthetic that you are drawn to. Contact them and use all of the information you’ve gathered to discuss the parameters, scope and style & material preferences.
Once preliminary drawings are complete you are ready to begin taking the plans to builders and contractors in order to get the estimating process started but remember that the more complete and comprehensive your plans are the more accurate your bidding process will be.
Step 4
Obtain Estimates from Contractors
Your architect will advise you when plans are ready to be submitted for bid. However, if your plans are incomplete or missing key features like framing & foundation plans, window & door schedules, structural specifications etc. then your contractor may want to wait until those are included before even beginning to estimate your project. Leaving these details up to the contractor to determine will mean that it will be hard to compare one quote to another. One contractor may factor in sub par materials, cheap windows/doors while another includes higher quality materials and those minor differences will quickly add up to a major cost discrepancies between bids.
Some architects have a list of preferred contractors or you can do your own research and determine which companies you are interested in quoting the project with. When vetting companies consider all of the factors; too often homeowners make a decision based on price and timing. They want the project done for the lowest cost and/or the earliest start date. Basing decisions on these factors often leads to hiring a contractor who perhaps just wasn’t very detailed with their cost estimation process so hadn’t included all factors. It stands to reason that the most qualified and professional companies that do the best quality work will have a bit of a backlog so plan for that and be flexible with the timing of the project.
Read all bids and scope details carefully and be wary of vague or missing information and never make assumptions that anything not in writing is included in the overall cost of the project. A qualified company will provide a detailed scope with an outline of the types of materials they will use for your project. They will also be able to answer any questions you have about a process, product or cost. Open communication at this phase is key. Knowing what materials & methods are being proposed in the project can help determine the reason for any variances in cost from one company to the next.
Keep these questions in mind when selecting a contractor:
Are they a professional company with all of the proper licences, insurance & certifications?
How long have they been in business?
Have they completed recent projects similar in scope to what you are proposing?
Do they have a team of qualified office & in-house staff that will bring experience and knowledge to the table?
Does their proposal/contract include a detailed scope and material specifications?
How do they manage a project? Will you have access to updates, schedules, financials via a client portal?
What portions of the project, if any, will you be responsible for managing or supplying materials or fixtures?
How do they communicate? Will they be available via phone, text and email?
Can you contact past clients to discuss their experience in working with them?Once you’ve selected your contractor be sure to sign a formal contract or agreement about the specific scope and payment terms and have a general discussion about their availability to begin the work and how long the project will take so you have a realistic expectation about start date & timing going forward.
Step 5
Permitting & Product Selection
You’ve selected your professionals and signed your contract and your contractor begins pulling permits and processing all of the paperwork to prepare for the start of your project. Before you hand your project over to them there are still many decisions to be made before your project can begin. Product selections will be your next big task. Your contractor will likely provide you with vendor resources to make your selections with and an idea of which selections take priority, typically the first on the list is windows, doors, siding & roofing, followed closely with appliances, cabinetry, plumbing fixtures, flooring, tile, paint colors etc. Each project is unique so be sure you have an idea of what choices need to be made and by when. Once your choices have been finalized your contractor will then confirm when products will be available for delivery and build your project schedule and start date around those lead times.
The last thing you or your contractor want is to have a project in progress be held up by a product that is backordered or has long lead times that no one anticipated. This is why planning and preparation are key to a successful project. With everyone doing their part to ensure products are selected, permits are pulled and schedules are created to coordinate with available product dates your project can move along swiftly with no bottlenecks or surprises.
So whether you are building a new custom home, adding an addition or remodeling an existing space taking the time to properly plan your project will be the difference between a pleasant and stress free project and one riddled with problems and unforeseen costs and delays. Everyone wants their project done as quickly and cost effective as possible including your building professionals so take a team approach to the process and work along with your design & building team to meet the deadlines for product selections, make timely decisions on any design changes and communicate openly and often.
Anyone looking to remodel, redecorate or refresh their home should definitely make a stop on Houzz.com first.
What is Houzz?
Houzz.com is the leading online platform for home remodeling and design. With the largest residential design database in the world Houzz is the easiest way for people to get the design inspiration, project advice, product information and professional connections they need to help turn ideas into reality.
Why we like it…
Houzz.com is a valuable planning tool for our clients. It helps them find inspiration, product information and be able to organize and share that information with us at critical points in the remodeling process. For more information on planning your next project check out our project planning guide “Project Planning 101”
How you can use it…
Search hundreds of thousands of photos to get the specific image you need to inspire you. You can get pretty specific with your search to find just what your looking for. For instance if looking for inspiration for grey cabinets with white counters just type that description into the search bar and select “in photos” to scroll through hundreds to thousands of photos that fit your specific criteria.
Sort the images by region if you want to see what products & finishes are trending in your area.
Collect those images and any images from the web in your own custom idea book.
Share your ideas and notes with your design & building professionals for enhanced communication & a more accurate bidding process.
Lighting or lack thereof can really make or break a space. Many people think of lighting in terms of what is appropriate for performing specific tasks but strategically placed accent lighting can create drama & increase the impact of a specific design element.
From our projects…
The custom mahogany floating shelves pictured here from our Jerusalem Kitchen & Interior were outfitted with recessed LED lights that illuminate and highlight the glassware & decorative accessories but they are very low profile allowing the shelves and their contents to be the star.
The directional recessed lighting in the custom bookshelf photo from one of our latest basement renovations (bottom left) really brings a sense of drama to the bookshelf architecture. The backlit bathroom vanity mirror (bottom center) creates a soft ambient glow and makes the mirror appear to float off of the wall.
Accent lighting can also be it’s own design element creating visual interest and even focal points within a room, as is the case with the crystal chandelier(bottom right).
Planning is key…
Be sure to make lighting a part of your planning process. If working with an architect or designer, have them draw up an electrical or lighting plan that outlines the specific locations and different types of lighting fixtures you want in your finished space. Planning for lighting in advance will help you to consider the overall design and how light impacts each area.
Even though the popular HGTV show “Fixer Upper” has come to an end the shiplap craze it created is still going strong. Shiplap comes in many different varieties but nickel gap shiplap seems to be the clear winner in popularity amongst our projects lately. Nickel gap is a tongue & groove product that has a distinct gap between the horizontal boards; admittedly a bit larger than a nickel but with the same crisp squared edge.
From our projects…
Nickel gap bench & wainscoting
White painted Nickel gap shiplap was paired with a custom natural walnut seat to create this unique built-in bench from our Lincoln Kitchen Remodel. The Nickel gap spills over from the bench onto wainscoting that carries around the rest of the eat-in portion of this kitchen.
Nickel gap fireplace surround
White oak nickel gap with a rubio oil finish was used to surround this Hingham Master suitefireplace, creating a clean modern feel. Although a less common application, the nickel gap in the natural finish becomes the focal point in this master bedroom.
Classic Nickel gap wall paneling
In the most classic applications nickel gap is used as a horizontal wall paneling in one of our recent Century Lane kitchen Remodel & Addition projects. This mudroom gets a clean fresh feel taking the shiplap from floor to ceiling.
This inspiring faucet has an almost magical quality to it’s design and would make a statement and be a conversation piece in any home.
The designer was given creative freedom to create something that transcended traditional manufacturing thought processes. The use of negative space has immense impact but created challenges when function was introduced. This is where good design inspires amazing innovation. The faucet employs 3d printing techniques to precisely manufacture the water path through the minimal simplistic body of the faucet.
We have a feeling the new Kallista Grid faucet will be showing up on some of our future projects, maybe even yours.
Arches have been used in classic architecture for Centuries. Dating back to Roman times arches were used as a means to span large distances and create structural integrity that was hard to achieve before the use of modern steel & engineered lumber were available.
Today arches are still used but typically more for decorative purposes. The Elliptical arched doorway has become a popular choice in many of the projects we complete. This classic detail can add depth & drama to an entryway as shown above or be a decorative transitional element between two spaces.
The execution of the detail is not quite as simple as you might think however. Most building materials don’t naturally bend to conform to a curved or arched shape. With a little know how, some precise math and a whole lot of glue & clamps the Thorson Team is able to create this beautiful & timeless finish detail at many of our projects.
Skylights are a great way to bring natural light into an otherwise dark space. The latest technology in skylights has them fully automated with touch screen remote controls and water sensors that can automatically close the unit if rain is detected.
The unit in the photo (left) brings much needed natural light into this bathroom with no windows and also affords additional ventilation in an area where it is needed most.
In the case where there is a space restriction or limited budget sun tunnels are another viable option. They work by channeling the sunlight down a much smaller cylindrical tube into the finished space. In our COTY Award winning Bath remodelwe used 3 sun tunnels that were finished to mimic the look of full skylights but allowed us to work around obstructions in the attic space giving the illusion of a full size skylight from the finished space.
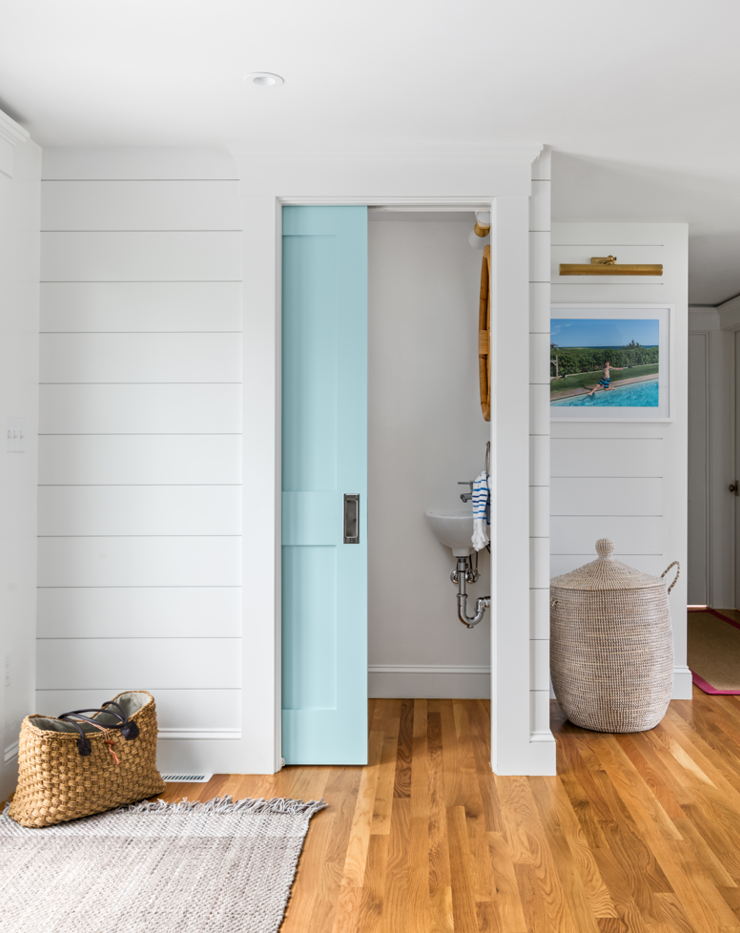
By nature the pocket door is meant to be out of sight but it’s practicality will never be forgotten. This door style has been used for centuries and it’s benefits are still as useful today as they were 100 years ago.
Pocket doors are framed to slide into a “pocket” in the wall when not in use. Unlike a normal door they require zero clearance around them for operation which makes them ideal for small and tight spaces.
The doors pictured to the left are from our featured Hingham Addition projectand were used in two areas where space was at a premium; the pantry and a small office just off of a main hallway. Both areas would have sacrificed a lot of space by using a traditional door and both are spaces that require closing off for either sound control or to conceal messy kitchen prep. When opened the doors are completely out of sight. In the case of the office, glass doors were used to provide sound dampening while still allowing light into the space.
The Pantry door was one that although they opted for the look of a french door, frosted glass was used to have the option to close off the space visually. If entertaining they can keep messy prep contained in the pantry by just closing the door. But really when you have a pantry as nice as this one you may want the door open more often than closed!
The sometimes overlooked pocket door was the perfect solution to both of these space & design dilemmas, and thankfully they look pretty nice too!
For more information on pocket doors or to incorporate this design detail into your next project contact us online or call our office to speak with one of our representatives.


 Divided lights refer to the style of grid that appears to “divide” the window pane. Taking your home style & any existing windows into consideration will help to make this choice. Different options offer various aesthetic & practical advantages. Here is a list of some of the most common divided light styles:
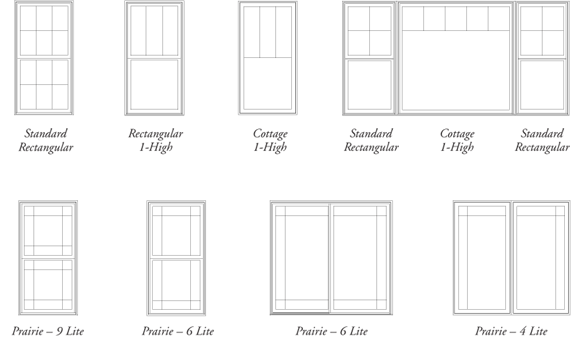
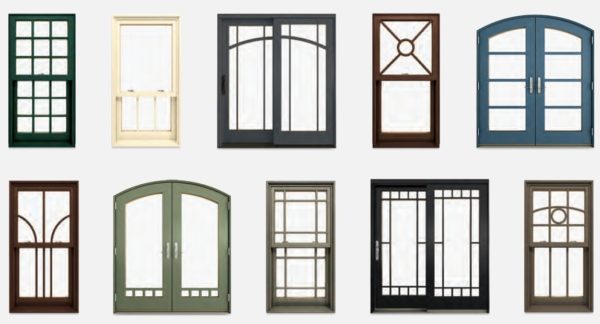

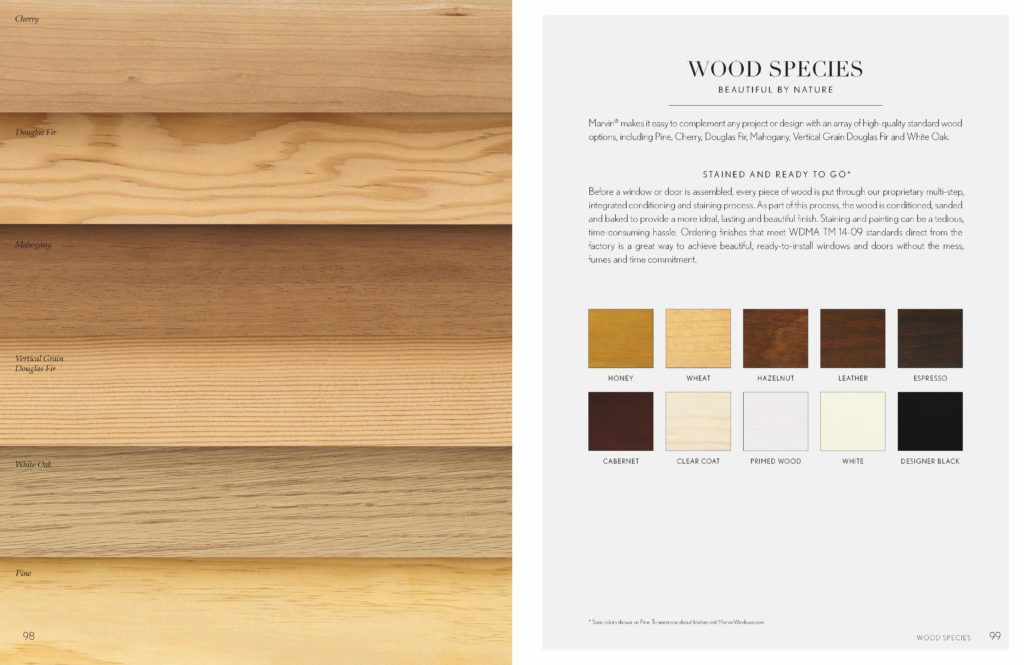
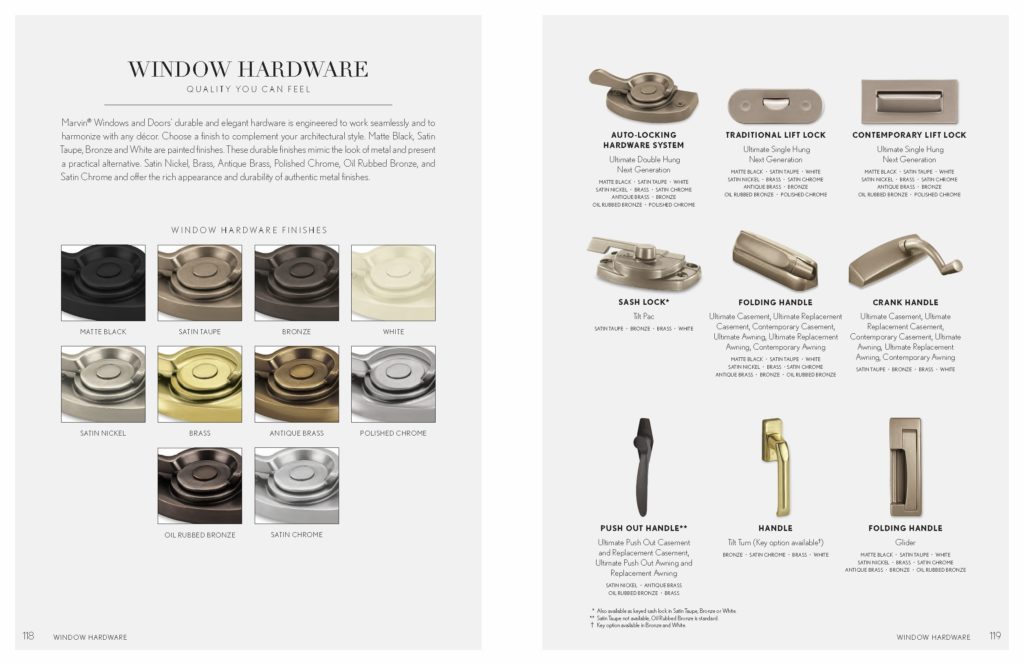
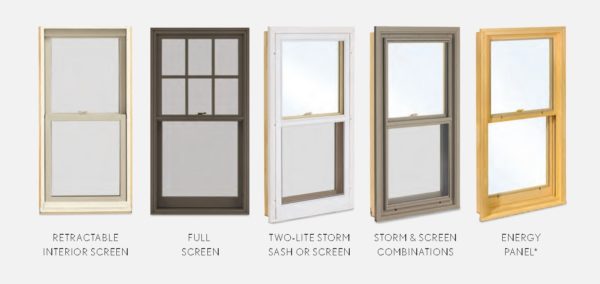
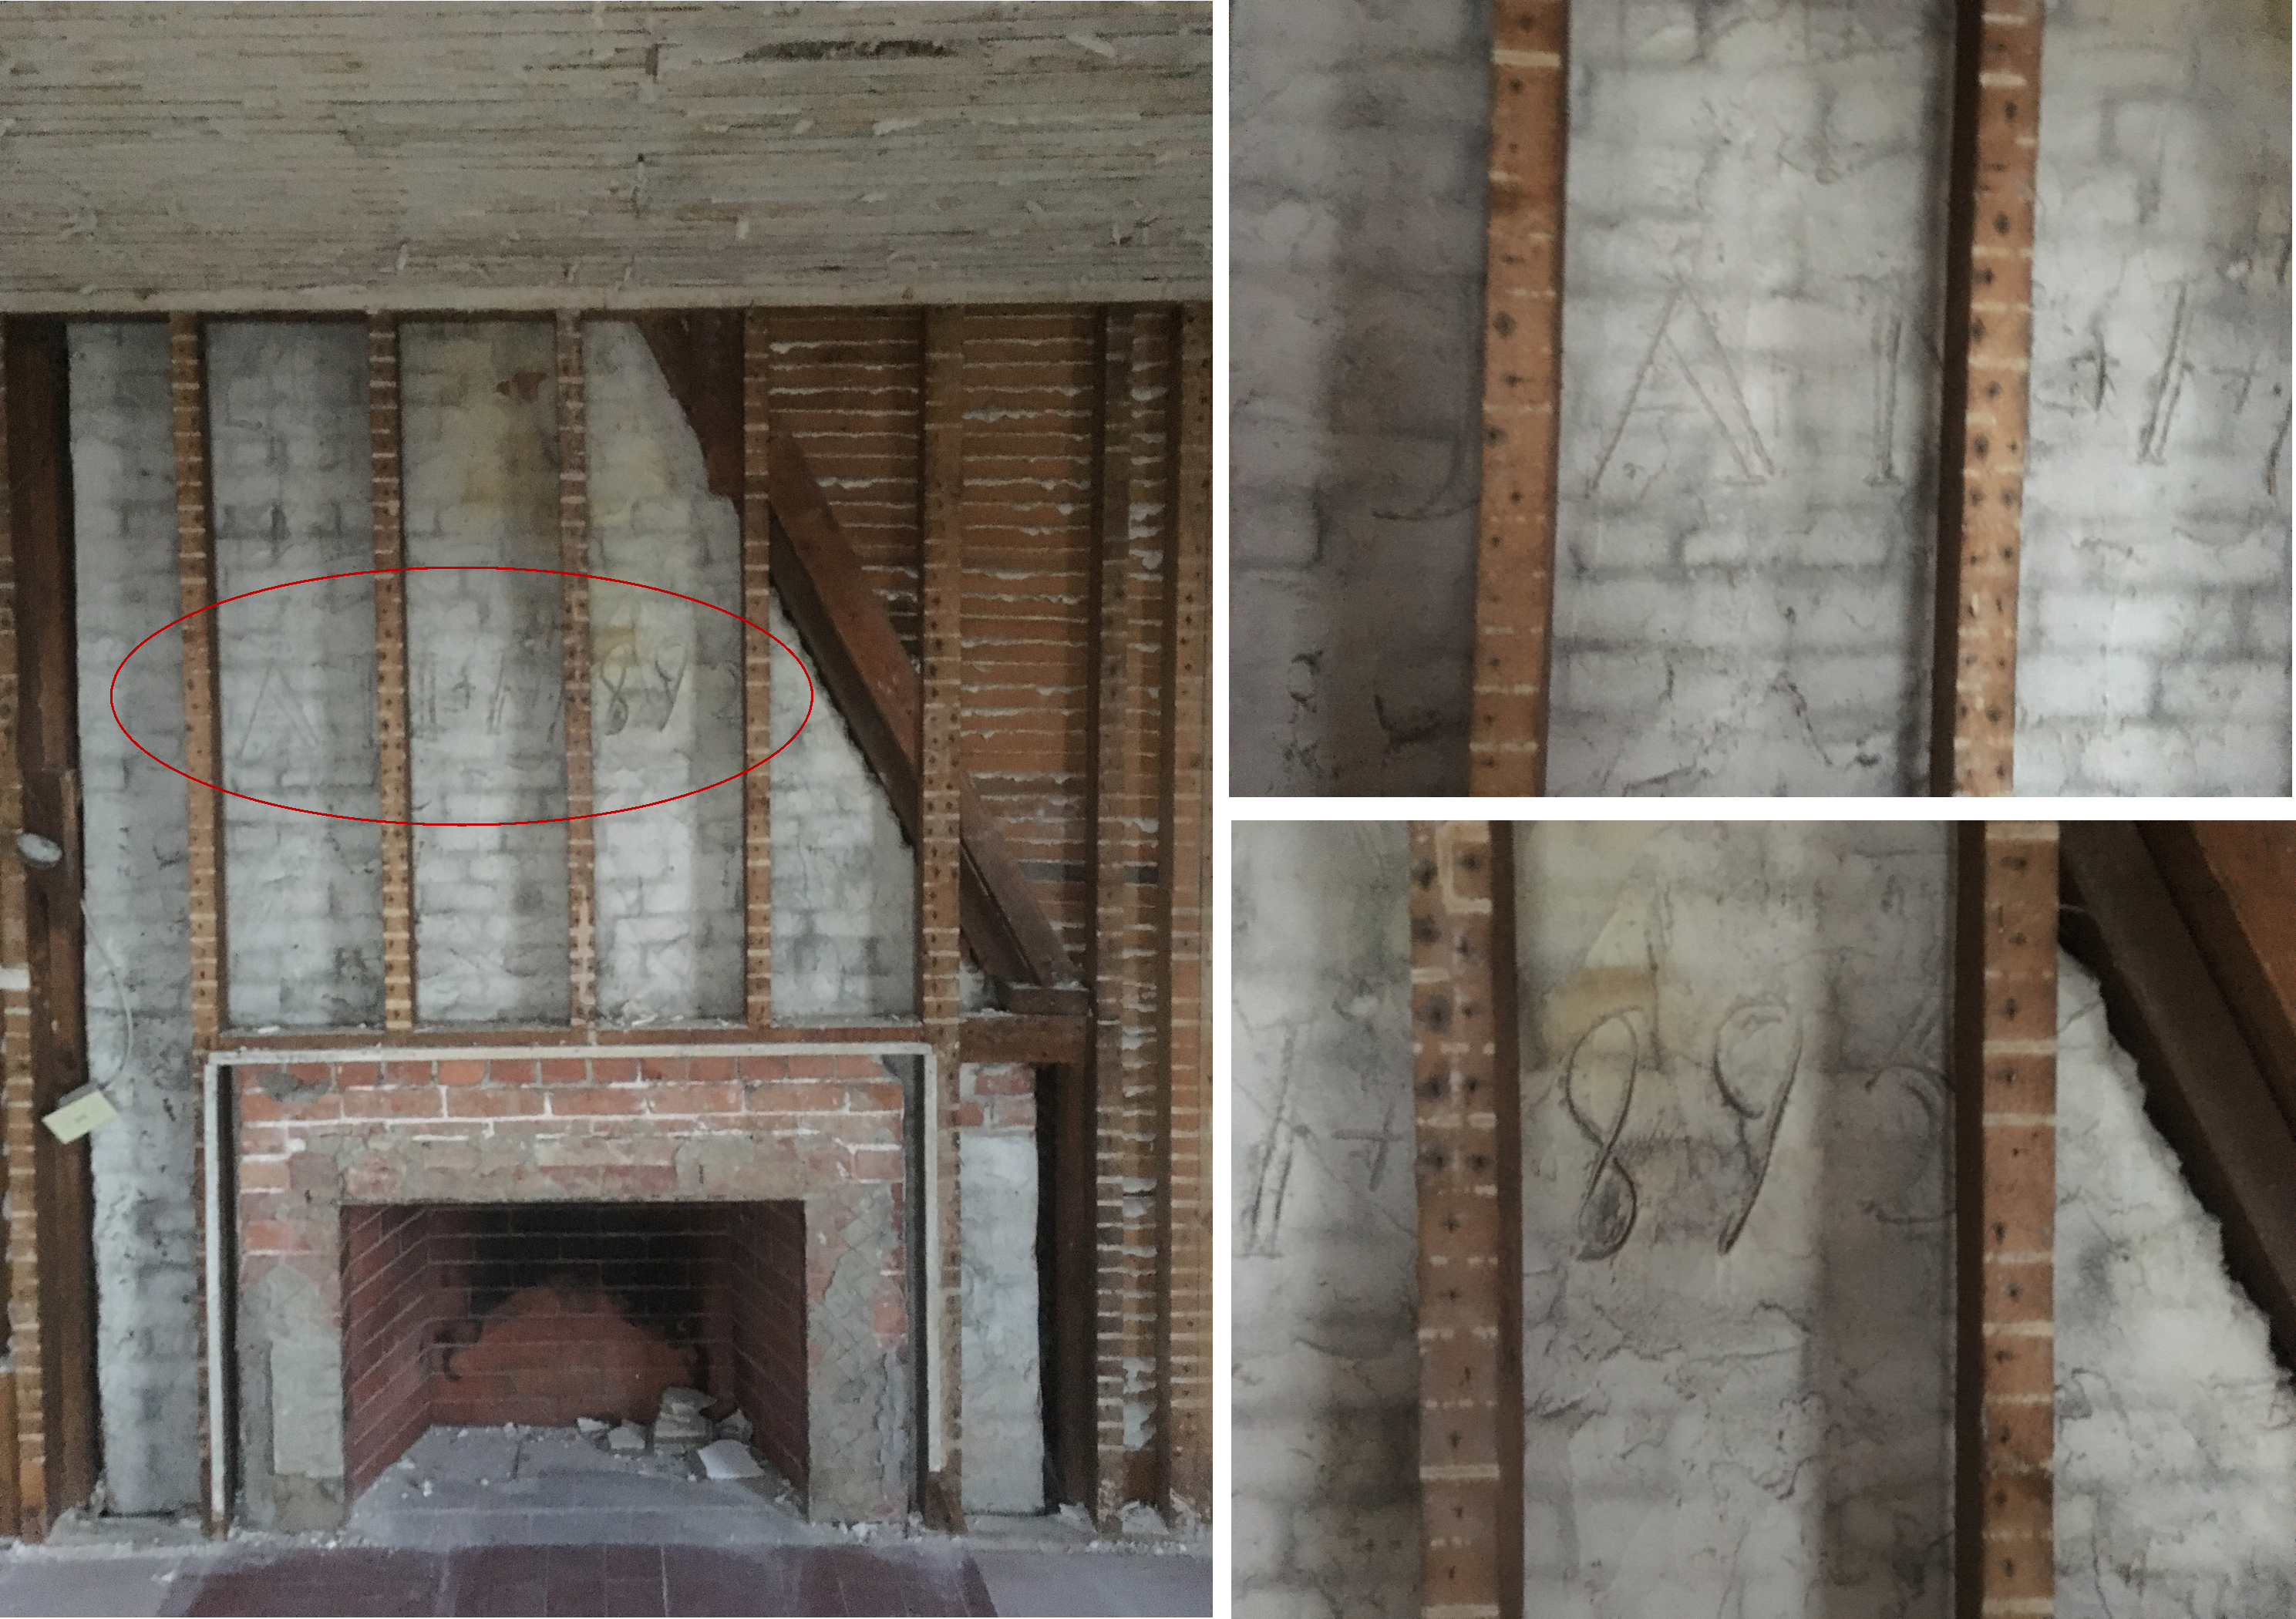


 This home, built in 1922 was one that evoked a sense of nostalgia for the client who was raised in this coastal community and since returned to spend countless summers always surrounded by friends and family who occupy several other homes in the area. They personally rented this summer home for years and when it came on the market there was no question that they would purchase it and plan to keep in in the family for generations to come. The home was loaded with charm but needed updating, especially in the kitchen and bathrooms. The family also needed more space in the home overall to be able to comfortably summer here.
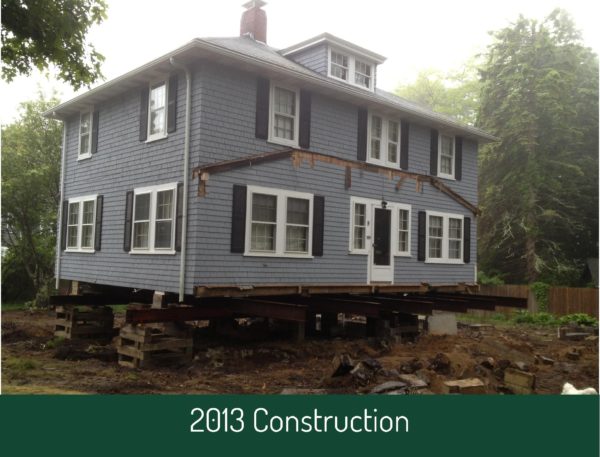 The house was lifted off of it’s foundation, porches removed and a new full height foundation was poured to allow for the finishing of the entire basement area. This portion of the project presented plenty of challenges but the homeowner once again saw value in making this home well suited for them so chose to move forward despite the complexity of the work. The new full height basement significantly increased the square footage of the home and added an additional bathroom, kitchenette and recreational space that the entire family could make use of.
 In 2016 a small underutilized detached garage on the property was demolished and a new 2 car garage with recreational space above was built in it’s place. The garage is perfect additional entertainment area for the countless family visitors that frequented the property throughout the summer months. Aesthetics of the property were significantly enhanced with exterior finishes to match the newly remodeled main home.
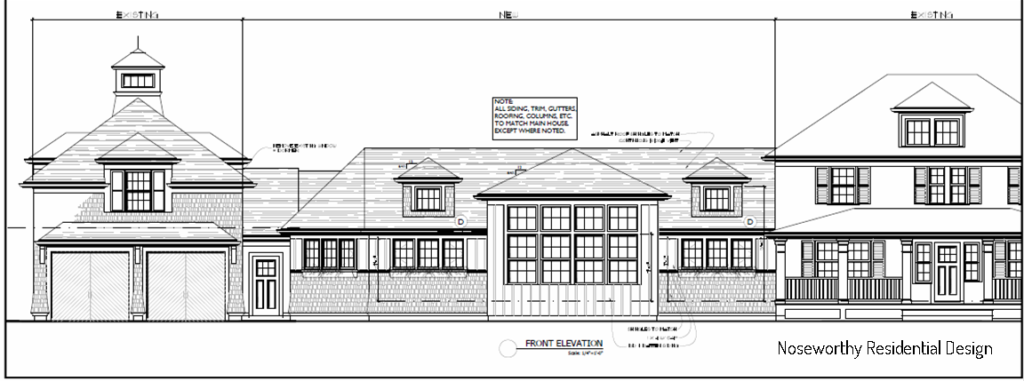
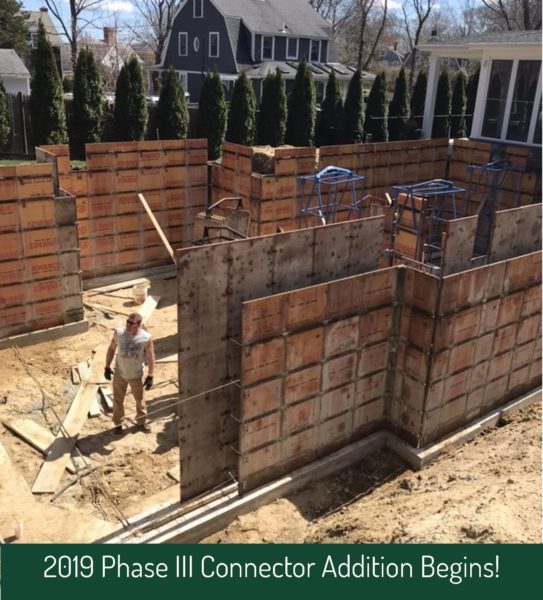
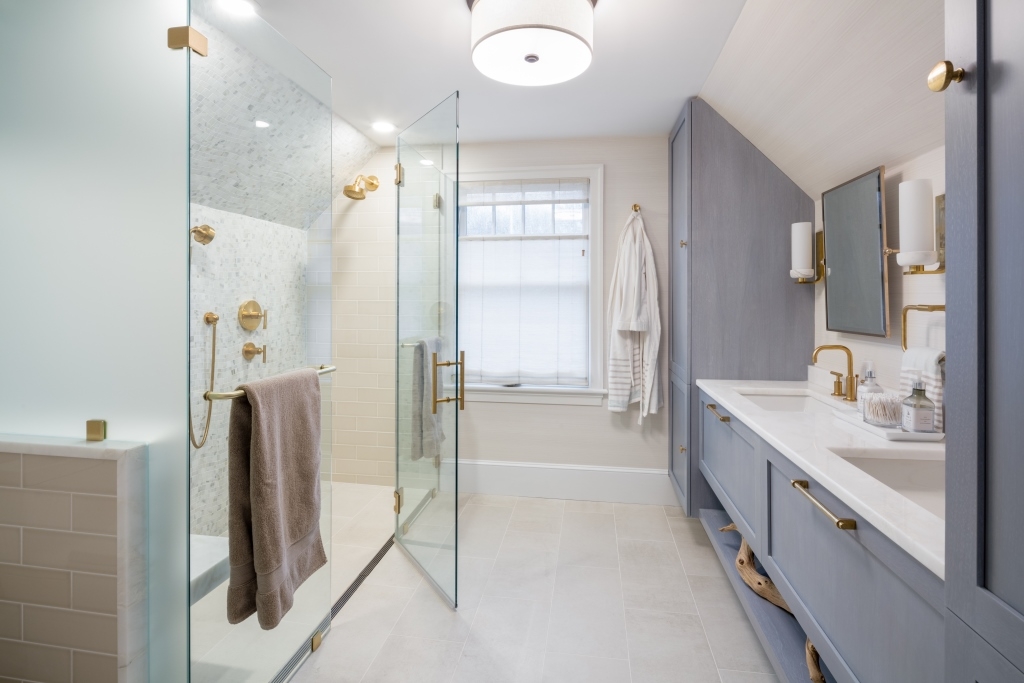
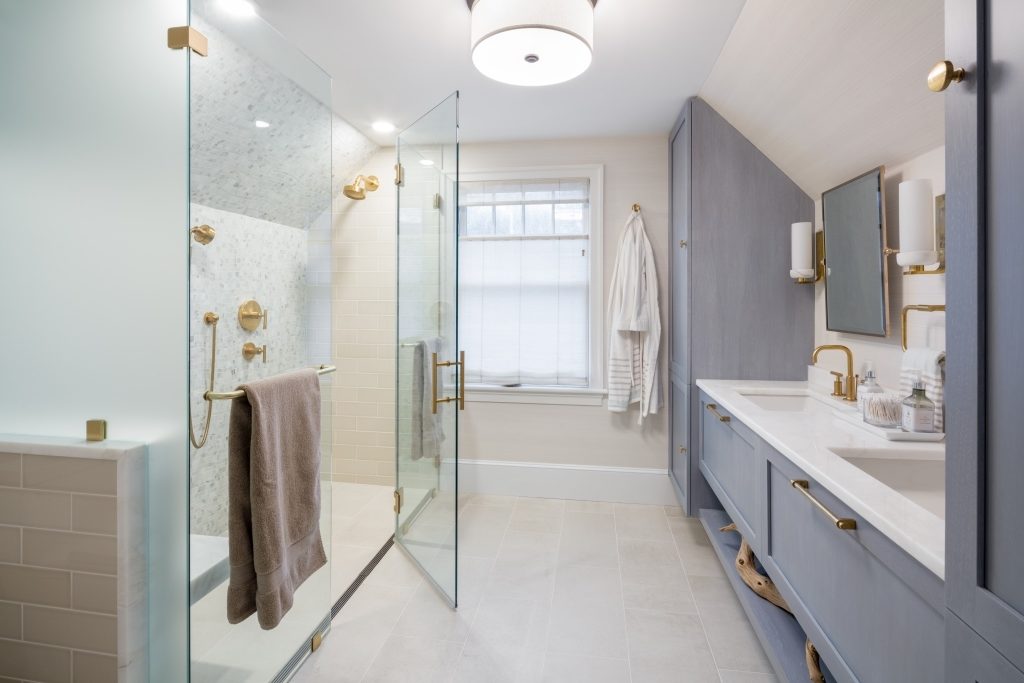


 Picture this;
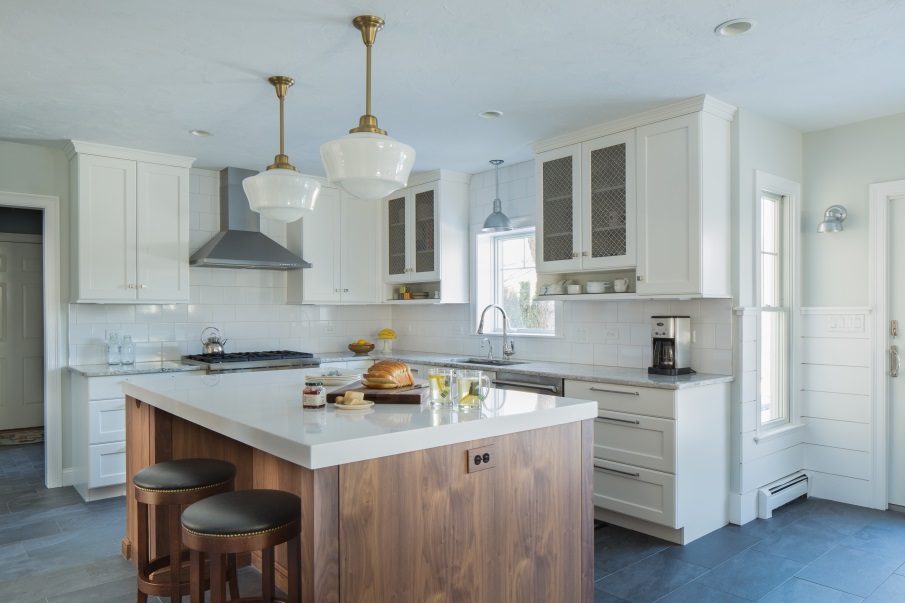
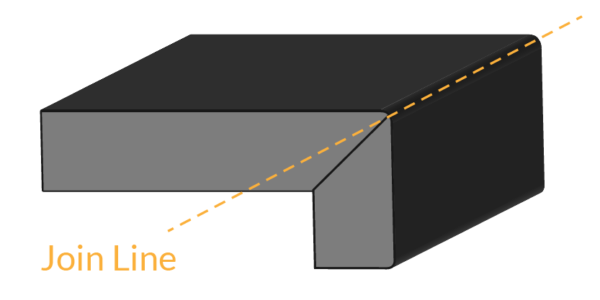 What most don’t know about these thicker counters is that they are actually a mitered edge. It is very uncommon (and costly) to have a stone slab cut at a thicker depth. It would make the stone almost unmanageable for installation and may even be too heavy for most cabinetry that would support it.
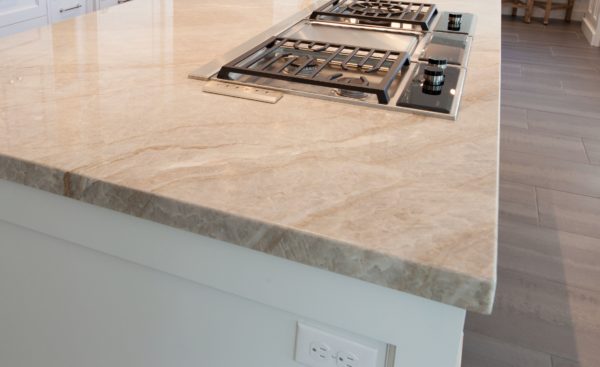
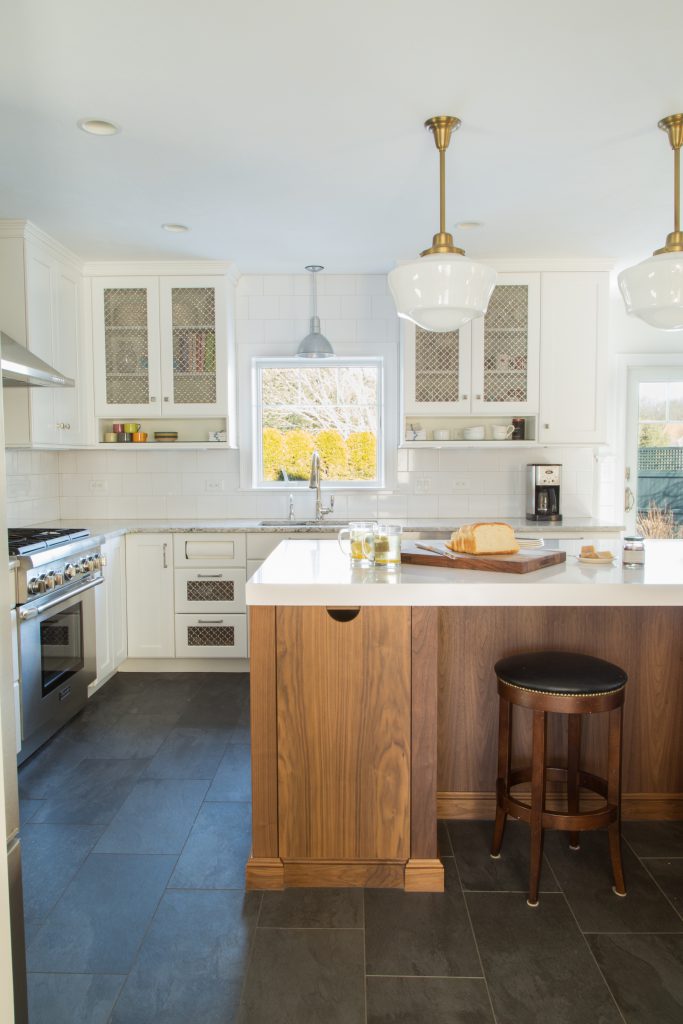


 How it works


 If structural changes are in the plan, an architect will be the next step. If only interior renovations are planned you may just want to enlist the help of an interior designer. Architects and designers have inherently unique styles and strengths so do your homework and find one that tends to have an aesthetic that you are drawn to. Contact them and use all of the information you’ve gathered to discuss the parameters, scope and style & material preferences.


 Lighting or lack thereof can really make or break a space. Many people think of lighting in terms of what is appropriate for performing specific tasks but strategically placed accent lighting can create drama & increase the impact of a specific design element.


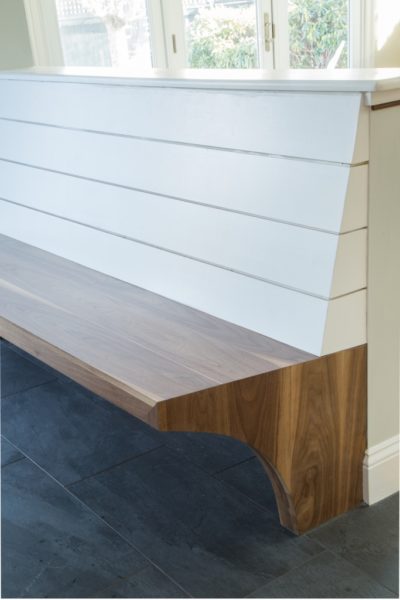


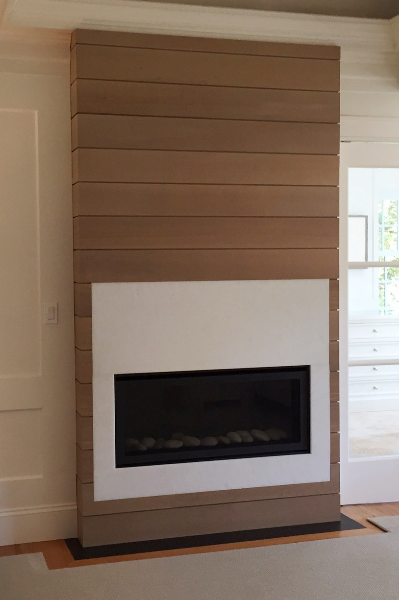
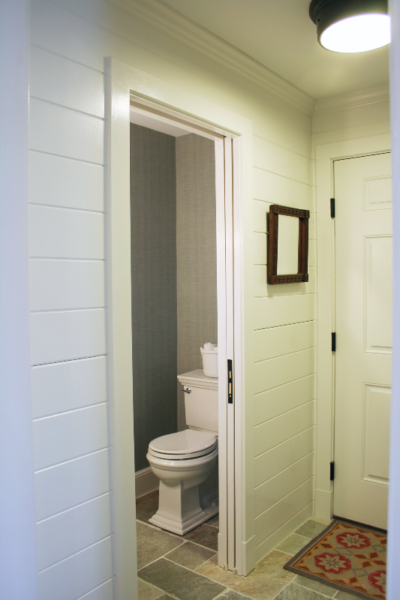


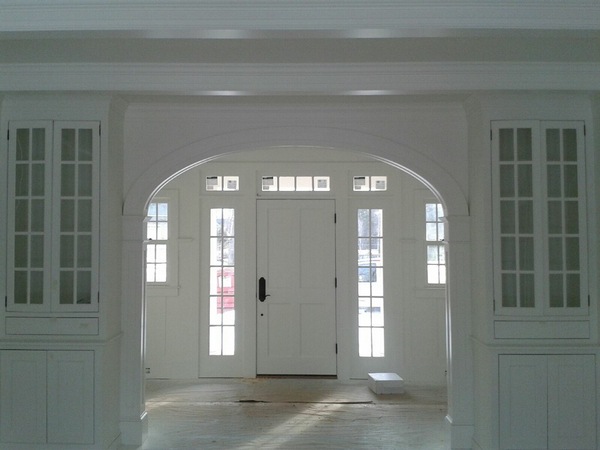


 The execution of the detail is not quite as simple as you might think however. Most building materials don’t naturally bend to conform to a curved or arched shape. With a little know how, some precise math and a whole lot of glue & clamps the Thorson Team is able to create this beautiful & timeless finish detail at many of our projects.
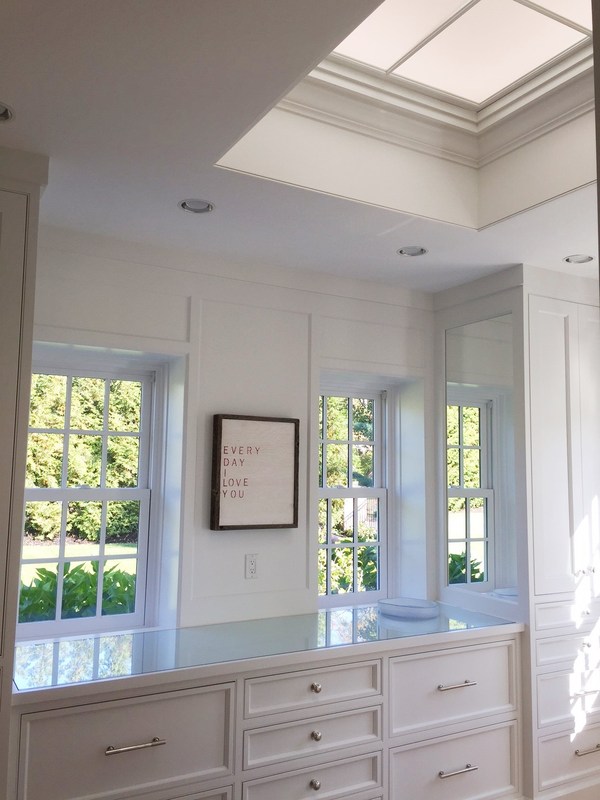
 Skylights are a great way to bring natural light into an otherwise dark space. The latest technology in skylights has them fully automated with touch screen remote controls and water sensors that can automatically close the unit if rain is detected.


