Tag: planning

Choosing your window details

Window details are often overlooked when planning a building or remodeling project.  Most homeowners have a broad sense of what their windows may look like based on architectural drawings but they may not give much thought into the many options and details that are available and how those choices will effect the beauty & functionality of their home.

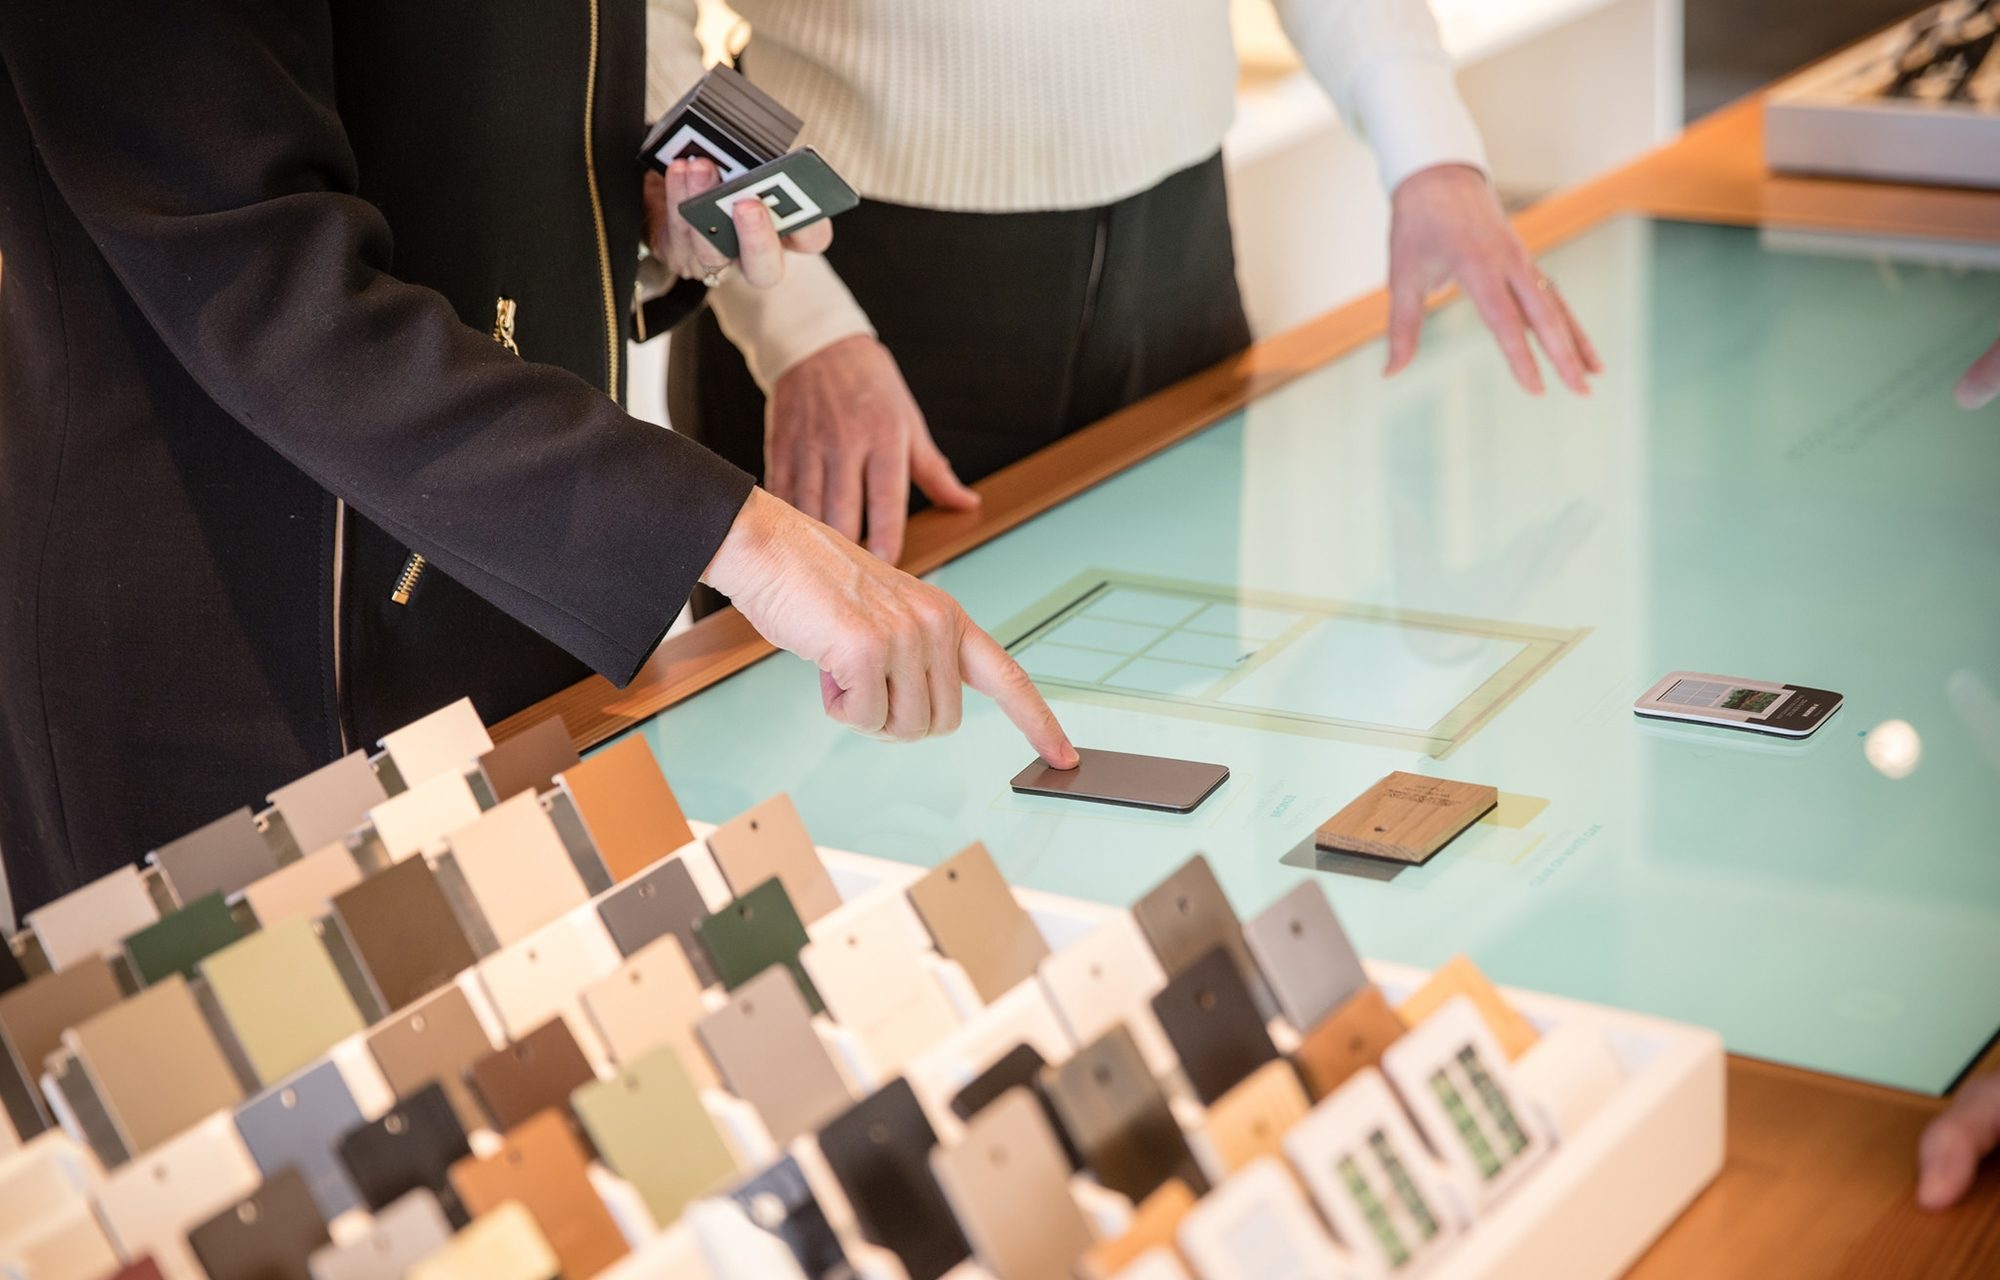
We recently had the privilege of visiting Marvin’s design showroom at their 7 Tide location in Boston. The showroom integrates life size displays and modern technology to create an immersive design experience for builders, architects & homeowners alike. While most don’t think of  windows as key design elements in our homes, Marvin is trying to change that perception. With seemingly endless combinations of options this hands on environment helps designers and homeowners get a true sense for the many options and how they affect both the aesthetics and function of your windows and ultimately your home.

Most of our clients are surprised to learn of the number of decisions that need to be made in relation to their window choices so we’d like to take the mystery out of the process and give you a quick list of the many options available. We’re using Marvin windows as our example here because they offer a high quality product with some of the largest variety of options available.

Here is a breakdown of some of the most common features you will need to decide on:
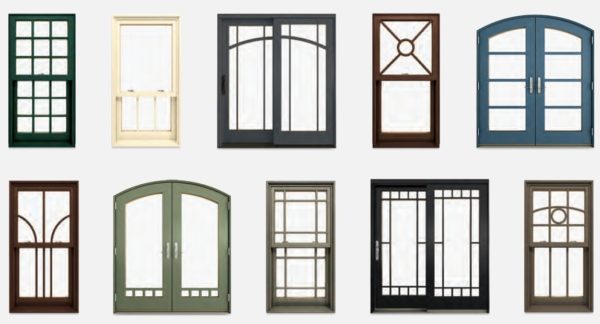
Window Style

Windows come in different styles or types -the style typically refers to the way the window operates. A home will typically have a combination of different types depending on the application & location of the window. Some of the available types and what they mean are as follows:

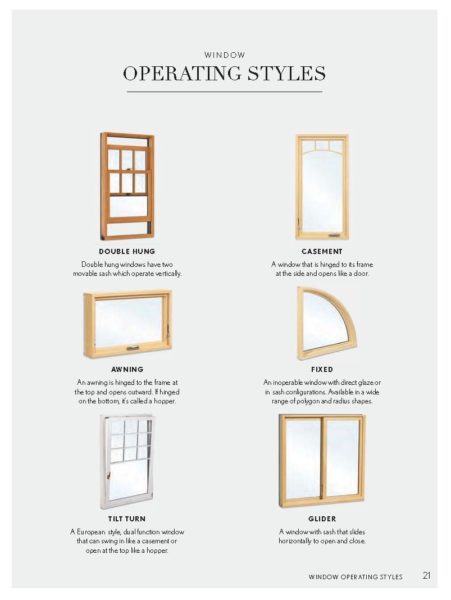
Fixed – the glass is stationary or non operational and does not open.

Single hung -fixed top sash and an operable lower sash that slides up and down.

Double hung – Both top and bottom sashes are operable and can slide up and down. Most also tilt in for easy cleaning.

Casement – Single operable sash that opens via a crank or a manual push out that opens the window on one side only -Marvin now offers a revolutionary “wash mode” that allows the casement window to revolve completely around and allow access to clean the exterior from the inside of your home.

Awning – Also a single operable sash that opens the window at the bottom only -providing more water shedding ability when the window is open.

Glider -a double sash window with one fixed and one operable sash that  glides/slides left to right.

Tilt Turn -a European style, dual function window that can swing in like a door or casement or open at the top like a hopper for generous air exchange

.

Window Frame Type

Traditional -a traditional window frame is classic in design, the largest of the three frame options


Contemporary  -more streamlined cleaner lines, narrower frames -ideal for combining multiple units into stunning window wall configurations


Modern –  most streamlined of all options, smallest frame sizes for vast minimally obstructed views. This style is closest to a commercial look and well suited for ultra modern design aesthetics.


Glass & Glazing

A number of glass & glazing options are available; some, like the high wind glass and tempered glass may be required in some circumstances by your local building codes, so check with your builder to confirm your window glass is in compliance with local codes.

The glazing of your window will impact it’s energy efficiency. Marvin’s standard glazing is their “IG” or insulated glass, this is a double pane with argon gas between the panes and Low E2 coating, to act as an insulator and reduce heat exchange through the glass.

Different versions of insulated glass are available including tripane glazing and Low E1, Low E2 and Low E3 to meet the requirements of any climate region. Be sure to check with your local builder or supplier to confirm which is most appropriate for your climate zone and individual application.

Textured , and semi-transparent glass options are also available to be incorporated into any window configuration.


Divided Lites -Type

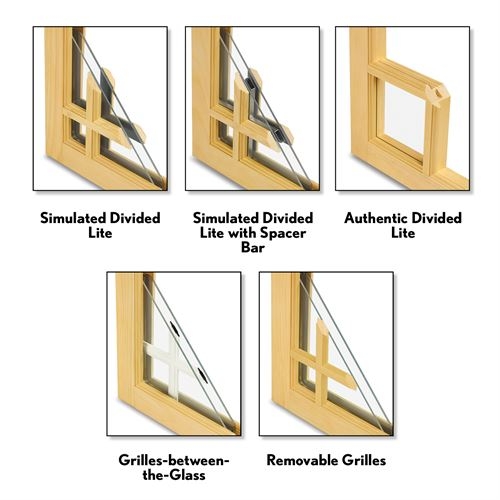
Divided lights refer to the style of grid that appears to “divide” the window pane. Taking your home style & any existing windows into consideration will help to make this choice. Different options offer various aesthetic & practical advantages.  Here is a list of some of the most common divided light styles:

Authentic Divided Light (ADL): individual panes of glass with true divided wood sections in between. This is a common option if historical authenticity is desired.

Simulated Divided Light (SDL):  Fixed Grid patterns are installed on both the exterior and interior of the window panes.

Simulated Divided Light with Spacer (SDLS): A spacer bar is added at the locations of the grid pattern to give the illusion of a true divided light.

Grilles Between the Glass (GBG): Grilles are placed in between the two glass panes, this option allows for easier maintenance and clean up of t he glass surface but not everyone likes the look.

Removable Grilles – Many Manufacturers also offer removable grilles that affix to the interior of the glass only and can be removed for cleaning or to change the appearance if desired.

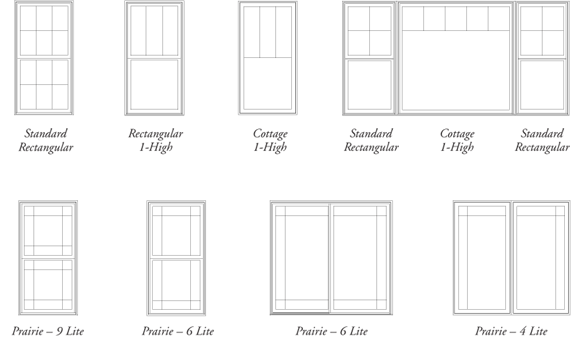
Divided Lites -Pattern

Once you’ve selected the type of divided light, you will need to select the pattern. Your architect may have already included a window grid pattern in your design but you may want to review this detail with the architect & discuss their reasoning behind the choices.   Available patterns can vary from one manufacturer to the next. Generally most homeowners choose to maintain the same grid pattern on the entire home or at least per elevation. In some coastal locations however many choose to vary the pattern. For their street side windows they may choose a classic grid pattern because of the architectural interest but prefer unobstructed views on the water side of their home so prefer a cottage style grid pattern or none at all.

With Marvin Windows a homeowner is only limited by their imagination. Although some grid patterns are more standard in nature the possibilities are endless and custom grid patterns can be made upon request to fit almost any design that you or your design professionals can dream up. As with anything however, the more custom in nature an item is the higher the cost to produce.

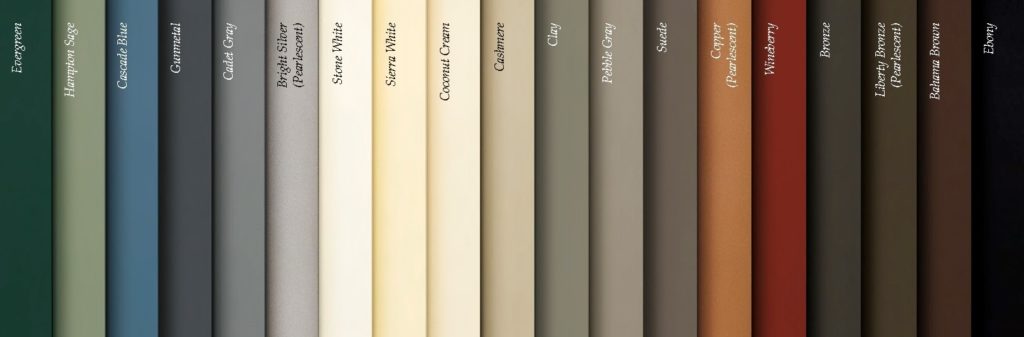
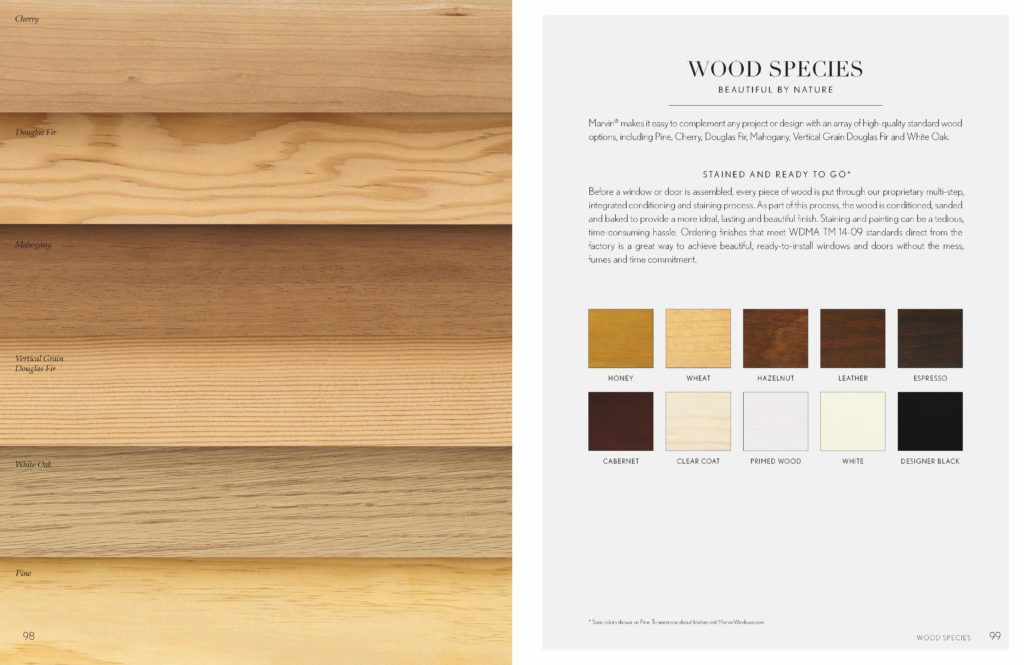
Color & Finish Options

Marvin Windows offers an aluminum clad product with wood interior and wood/aluminum clad exterior. A number of finish options are available for the exterior & interior. From stained to painted & even custom color finishes.

Marvin 2018 Exterior Clad Color options

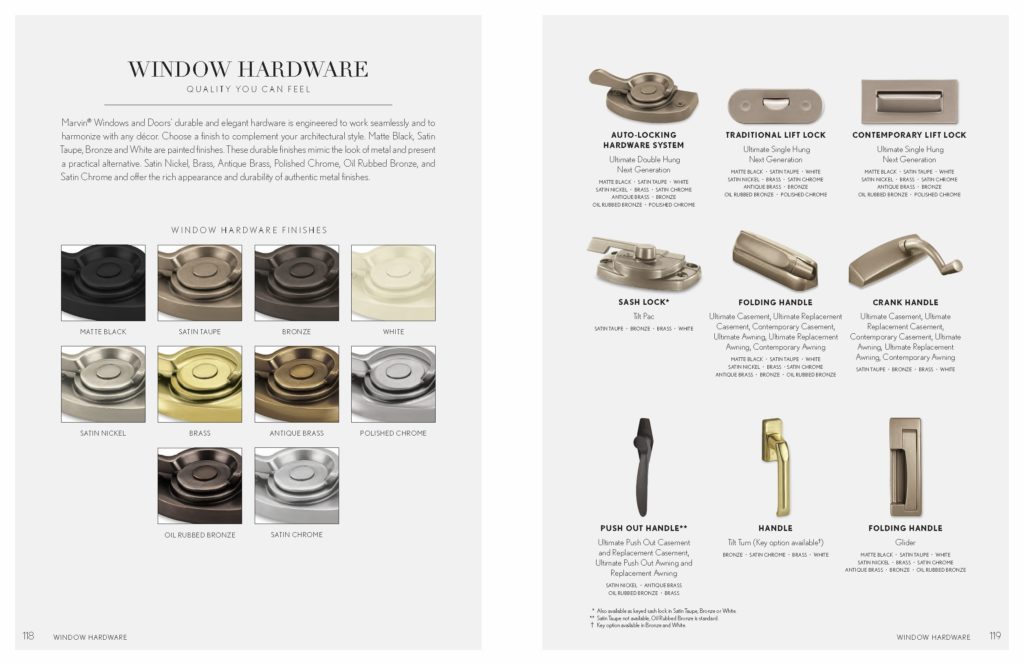
Hardware Type & Finish

Because window details are often decided early in a building or remodeling project deciding on details like the window hardware become quite an ordeal. Often our clients want to match all of the interior hardware finishes so deciding on window & door hardware color forces a commitment early in the process.

Different styles of hardware are available on specific products -reference your manufacturer’s catalog for a list of available hardware and finishes for the window types you have selected.

Screen Type & Finish

Even your window screens have options to consider and likely more than you ever thought possible.

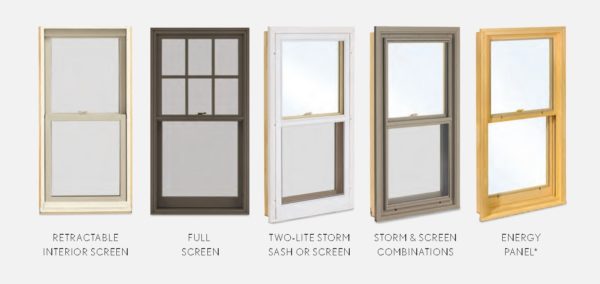
Retractable Screen: The innovative Retractable Screen, available on the Ultimate Double Hung Next Generation
Window, is a factory-installed screen that easily retracts out of sight when not in use. The screen can be drawn to rest at one of two stop points. The resulting seal at either the sill or at the checkrail lets the breeze in while keeping insects out. The screen is released from its set position with a click of the latch on the pull bar. With lift assist action, the screen returns to its concealed position as smoothly as it was drawn. The retractable screen sets to the interior of the window.

Full or Half Screen:– Exterior screen with an aluminum surround. The full screen covers both the top and
bottom sash. The half screen only covers the bottom sash.

Two-Lite Storm Sash or Screen A wood frame containing non-removable glass. The storm sash can be removed during the summer and replaced with a wood framed screen. Available only for wood windows.

Storm & Screen Combinations – A combination unit is composed of two glass panels and one screen
panel that can be easily removed from the interior for cleaning. Available with a wood (bare or primed) or aluminum
surround, panels can be configured multiple ways to accommodate season or preference: glass above screen, screen
above glass or glass above glass. One of the panels slides behind the other for self storage when the screen is in use.

Energy Panel – Often confused with storm windows, an energy panel is technically a glazing option. It is a removable,
exterior glass panel finished on the edges by a surround. Energy panels cover the exposed glass surface of each sash and
offer added energy efficiency for wood windows with single glazing.

We hope this list has given you insight into some of the many options that will need to be decided on prior to ordering your windows for your next building or remodeling project. The majority of the information and photos contained in this post were taken from the 2018 Marvin Window & Door Catalog. If you are about to finalize your window choices we highly recommend a visit to Marvin’s Window & Door Design Center  at 7 Tide in Boston where a knowledgeable team of representatives are available to guide you through the many available options and how they will best fit into your next project!

Ready to think about windows for your next project?

Contact us and let’s get the conversation started!


Linear Drains & Curbless Showers

Linear Drain From our “Bay Shore Bathrooms” Project

What is a Linear Drain you ask? Well they go by many other names including trough drain, channel drain & slot drain all of which are correct and simply refer to the shape of the grate & drain body. Instead of a round or square drain grate in a central location  where all areas of the shower floor are pitched toward the drain;  a “linear” drain is linear in shape and the attached drain body is a trough that channels water to one central exit port using a slope in only one direction. Linear drains can be installed in various locations in a shower but the most common is at either an outside wall or at the shower entry point. Drains of this type have been used in commercial applications and overseas for decades but have emerged more prominently on the US residential market in the last decade or so.

We’ve noticed that requests for linear drains are on the rise and they have been incorporated into many of our recent projects.  Curbless showers are also gaining in popularity whether it be for better access as a homeowner ages in place or to fit a more modern and streamlined aesthetic. These two features are often combined although it is possible to have one without the other; you can opt for the look of a linear drain but still want the peace of mind that a shower curb brings in terms of containing water in the showering area.  There are also alternative “curbless” or “level entry” drain systems that employ a standard center drain but are installed recessed into a subfloor to be able to eliminate the curb. Depending on the reasons for wanting either a linear drain or curbless shower entry a number of factors need to be considered to determine if they’re right for your home & project.

Many homeowners main objective in selecting a linear drain is to achieve a “look”. They perhaps saw one featured in a home design magazine or website and fell in love with the sleek modern feel. Some though, have more practical objectives like handicap accessibility or reducing tripping hazards. Whatever the end goal; there are pros and cons to consider.


Pros

  • Option for Curbless Shower entry

    Although linear drains don’t need to be installed in a level entry application, they do allow for this. Do note however that not all linear drains are recommended to be installed at a level entry point, check with your drain supplier & manufacturer for recommended applications of your specific drain.


  • Option for multiple drain exit ports
    Linear drains also allow for additional drain ports within the same drain body. Some states require additional drains by code if the gallon per minute rate of water flowing from multiple fixtures exceeds a predetermined amount. When a shower has multiple heads & body sprays etc. a second drain outlet is usually required. Having two standard drains is typically undesirable but the trough design of a linear drain allows for multiple exit points to be installed in line with the same main trunk, creating the look of only one linear style drain.
  • Nicer on the feet
    Because linear drains are typically installed at the edge of the shower floor it allows for a clear footpath at the showering area and makes it so the person doesn’t have to continually step on the drain underfoot.


  • Design Flexibility
    In a standard shower the floor tile is usually required to be smaller to be able to contour to a floor that pitches in multiple directions toward a central drain. With a linear drain the floor need only pitch in one direction, this allows for a larger format tile to be installed on the shower floor if desired. In some cases even continuing the main bathroom floor right into the shower if installed without a curb. No longer limited by the shower slope you can choose a tile floor of any size and shape meaning the design possibilities are endless! A variety of drain grates are also available on the market today in multiple patterns and finishes to suit any style.
Linear Drain from our “Lincoln Kitchen & Interior” Project

Cons

  • Higher Cost
    While a standard drain is pretty nominal in cost, a linear drain or any level entry drain system can multiply that cost significantly in some cases reaching in to the thousands when all material & labor costs are factored in. The product itself is more expensive and typically the installation, prep work & coordination is bit higher as well.


  • Installation Limitations
    Because of the size and requirements to install a linear drain you may be limited on where it can be installed. When working within an existing structure for a renovation the sub floor material, depth of the joists and path for running a drain line all factor into the feasibility of such drains. This style of  drain in general is much more difficult to incorporate into an existing structure as a retrofit. Even in a new construction the placement and planning will require much forethought, sometimes well before the engineering and framing phases commence. 


  • Longer lead times & added planning time
    Because of all of the additional planning involved and the custom nature of some linear drains or level entry drain systems the coordination time is longer and products are often custom ordered with longer lead times to arrive in. Be sure to notify your building professionals far enough in advance so all details can be worked out and products ordered in time for the rough plumbing phase of your project.


  • Reduced Water Retention
    when installing a curbless or level entry drain of any type there is an increased risk of water escaping the showering area. Simply put, water doesn’t always flow where you want it, splashing is inevitable and drains sometimes get clogged. A shower with a curb would at least retain any backup but a curbless shower would not,  causing water to migrate to other areas of the bathroom.

Whatever your reason for considering a curbless or linear drain there’s much to research & discuss before pulling the trigger. Every project is different and although one bathroom in a home may be a good candidate for a linear drain , another in the same home may not, so speak with your qualified building or remodeling professional well in advance to discuss your options and allow ample time to plan for a proper installation.


Planning your Remodel

When a prospective client calls our office they  have two main questions that often become the determining factor in whether we can work together or not; When can you start? and how much will it cost? Although these two questions are important and valid, they often can only be answered after we ask a few questions of our own;

How far along in the planning process are you?
Do you have a clearly defined scope of work?
Have you checked your local town  laws and regulations regarding ability to perform the work?
Are architectural plans prepared and contain enough information to provide an accurate cost estimate?
Have you thought about the materials and finishes your project will include?

Many homeowners are very focused on cost and timing and forget the many details that need to be considered before they even begin to obtain pricing for a project.

The reality is that the planning portion should be the longest phase of the entire building or renovation project. The planning phase is a multi-step process that should not be rushed.  So before you take the leap and call a contractor to ask the two ever important questions (how much? & how long?) take a moment and review the 5 steps to planning any building or remodeling project below and arm yourself with the information you need to have a successful and well planned project!

Step 1

Determine your objective & budget

Keeping in mind why you are remodeling start to determine the scope of the project. Will you add on to the home or work within the existing footprint? Are you planning significant structural changes to the home or just looking to update finishes and fixtures?  These questions will help you determine the right professionals to contact first.

Having clear budgetary goals will help  when determining scope also, obviously the more involved a project is, the more it will cost so your budget may to a degree drive the scope of the project.  Many homeowners don’t know what a project in their area would cost so have a hard time with this step. They may try to get a bid for the project as a first step,  but we advise against this because this early in the process it is almost impossible to project an accurate budget number.

Instead, we point prospective clients to Remodeling Magazine’s Cost vs. Value report to get a general sense of where their budget should be. The report lists cost ranges for 35 of the most popular renovations and the data is separated by region so the numbers are more accurate than a national average or regional study. An alternative would be to ask a trusted friend or relative who has remodeled recently or at least in the last 1-3 years.  Armed with a general idea of what your project may cost will help you to better refine the scope and determine exactly what your budget will allow.

Step 2

Gather information & ideas

If an addition or structural changes are in the plan then you will likely have some zoning, historical or conservation regulations to abide by. In some historic locations any change to the home’s exterior warrant a check in with the Historical Commision to ensure your plans are in compliance.

You can gather necessary documents like site plans, septic plans and as built plans from your local town offices. These documents will help you determine the area you have to work within to add on to a structure and will be necessary for the design & permitting phase.  You will likely also need to enlist the services of a site/civil engineer to draft new site plans showing your proposed changes if you will be altering the footprint or height of your home.

Now is also the time to start gathering ideas about your style & material preferences. Use online resources like Pinterest and Houzz to create digital idea books about spaces, designs and products that you like. The more specific you can be about the style, finishes and products you prefer the easier it will be for the professionals to plan for and price your project as accurately as possible.

Step 3

Hire an Architect or Designer

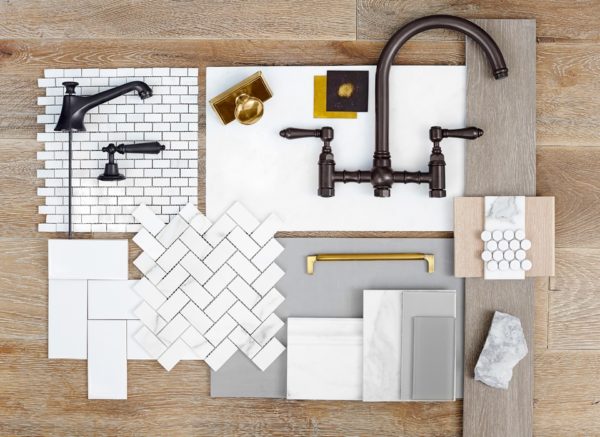
If structural changes are in the plan, an architect will be the next step. If only interior renovations are planned you may just want to enlist the help of an interior designer.  Architects and designers have inherently unique styles and strengths so do your homework and find one that tends to have an aesthetic that you are drawn to. Contact them  and use all of the information you’ve gathered to discuss the parameters, scope and style & material preferences.

Once preliminary drawings are complete you are ready to begin taking the plans to builders and contractors in order to get the estimating process started but remember that the more complete and comprehensive your plans are the more accurate your bidding process will be.

Step 4

Obtain Estimates from Contractors

Your architect will advise you when plans are ready to be submitted for bid.  However, if your plans are incomplete or missing key features like framing & foundation plans, window & door schedules, structural specifications etc. then your contractor may want to wait until those are included before even beginning to estimate your project. Leaving these details up to the contractor to determine will mean that it will be hard to compare one quote to another. One contractor may factor in sub par materials, cheap windows/doors while another includes higher quality materials and those minor differences will quickly add up to a major cost discrepancies between bids.

Some architects have a list of preferred contractors or you can do your own research and determine which companies you are interested in quoting the project with. When vetting companies consider all of the factors; too often homeowners make a decision based on price and timing. They want the project done for the lowest cost and/or the earliest start date. Basing decisions on these factors often leads to hiring a contractor who perhaps just wasn’t very detailed with their cost estimation process so hadn’t included all factors. It stands to reason that the most qualified and professional companies that do the best quality work will have a bit of a backlog so plan for that and be flexible with the timing of the project.

Read all bids and scope details carefully and be wary of vague or missing information and never make assumptions that anything not in writing is included in the overall cost of the project. A qualified company will provide a detailed scope with an outline of the types of materials they will use for your project. They will also be able to answer any questions you have about a process, product or cost. Open communication at this phase is key. Knowing what materials & methods are being proposed in the project can help determine the reason for any variances in cost from one company to the next.

Keep these questions in mind when selecting a contractor:
  1. Are they a professional company with all of the proper licences, insurance & certifications?
  2. How long have they been in  business?
  3. Have they completed recent projects similar in scope to what you are proposing?
  4. Do they have a team of  qualified office & in-house staff that will bring experience and knowledge to the table?
  5. Does their proposal/contract include a detailed scope and material specifications?
  6. How do they manage a project? Will you have access to updates, schedules, financials via a client portal?
  7. What portions of the project, if any, will you be responsible for managing or supplying materials or fixtures?
  8. How do they communicate? Will they be available via phone, text and email?
  9. Can you contact past clients to discuss their experience in working with them?Once you’ve selected your contractor be sure to sign a formal contract or agreement about the specific scope and payment terms and have a general discussion about their availability to begin the work and how long the project will take so you have a realistic expectation about start date & timing going forward.

Step 5

Permitting & Product Selection

You’ve selected your professionals and signed your contract and your contractor begins pulling permits and processing all of the paperwork to prepare for the start of your project. Before you hand your project over to them there are still many decisions to be made before your project can begin. Product selections will be your next big task. Your contractor will likely provide you with vendor resources to make your selections with and an idea of which selections take priority, typically the first on the list is windows, doors, siding & roofing, followed closely with appliances, cabinetry, plumbing fixtures, flooring, tile, paint colors etc. Each project is unique so be sure you have an idea of what choices need to be made and by when. Once your choices have been finalized your contractor will then confirm when products will be available for delivery and build your project schedule and start date around those lead times.

The last thing you or your contractor want is to have a project in progress be held up by a product that is backordered or has long lead times that no one anticipated. This is why planning and preparation are key to a successful project. With everyone doing their part to ensure products are selected, permits are pulled  and schedules are created to coordinate with available product dates your project can move along swiftly with no bottlenecks or surprises.

So whether you are building a new custom home, adding an addition or remodeling an existing space taking the time to properly plan your project will be the difference between a pleasant and stress free project and one riddled with problems and unforeseen costs and delays. Everyone wants their project done as quickly and cost effective as possible including your building professionals so take a team approach to the process and work along with your design & building team to meet the deadlines for product selections, make timely decisions on any design changes and communicate openly and often.

Leave Room for Growth

Leave room for growth

Any one who gardens knows that a plant should be placed in a pot that will leave a little room for growth. You would be forced to re-pot pretty often if the subsequent pots were only a fraction larger than the last. With that in mind think of your next remodeling project…Why you ask? Because the same principle applies.

When planning for a project, particularly a large one, you want to be farsighted and “leave room for growth” as it were. It always makes sense to plan ahead… sometimes way ahead.

Think about how your life might change over the course of the next several years (or as long as you expect this renovation to last). For instance if you are approaching retirement and plan to spend your elder years in your current home, you may want incorporate some features that would make those years a bit easier. Or if you know you will be out growing your current home due to a growing family or changing needs you should consider what would appeal to the next potential home buyer.

Leaving room for growth also means planning for styles & finishes that will endure the test of time. I’m sure we all know someone who had to pull out a full “avocado” bathroom suite circa 1972…and it probably probably lost it’s appeal sometime in the 1980’s. The lesson? Sometimes the latest design trend can be a little too trendy, meaning it will quickly fade and be replaced by the next big trend.  To avoid renovating too often…leave room for growth!